
4 CASE STUDIES: Modernize Your Outdated 1990s Bathroom
AFFORDABLE UPDATE IDEAS FOR YOU & YOUR 90s LOO
When it comes to home updates, kitchens and bathrooms eat money like it’s candy, or at least they can if you don’t have a lil Ginger in your back pocket. Not only do I pinch upon request, but I’m full of fun, DIY, budget-friendly ideas for your home!
As mentioned in this other 90s-inspired bathroom blog post, my Instagram followers enjoyed the kitchen update blog posts and they WANT MORE! In particular, they want ideas to modernize their bathrooms without breaking open the kid’s piggy banks.
By the way, for those of you from Instagram/Facebook who sent in your photos, THANK YOU – you make my colorful little world go round (well…you, Starbucks, wine, and Ryan Reynold’s). And I know you’re all chompin’ at the bit to see if your home was chosen as an example in this blog post. I did my best to include as many as I could without writing a 15,000-word article. If your home wasn’t included, I still might use it in future blog posts!
If you don’t follow me on Instagram, please do (or subscribe to my blog, that works too).
Remember, anyone can demolish a bathroom and create a beautiful space from scratch (or hire a professional to do it for them)…
These update-related blog posts are about affordable, budget-friendly ideas that KEEP some of the existing finishes & layouts.

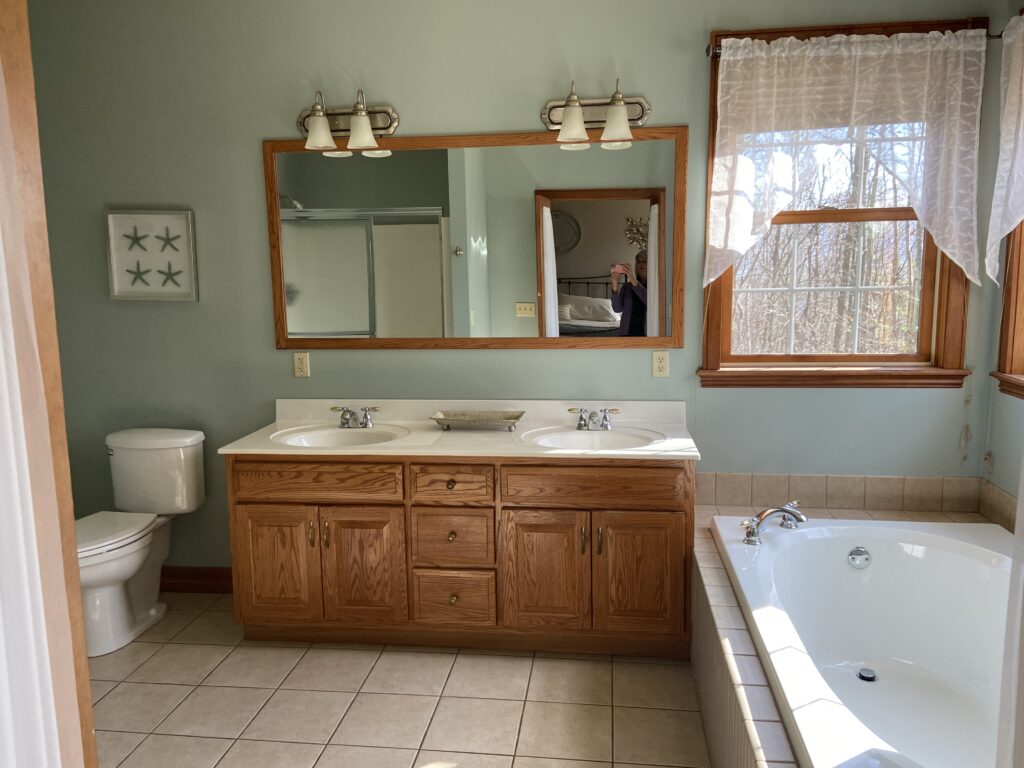
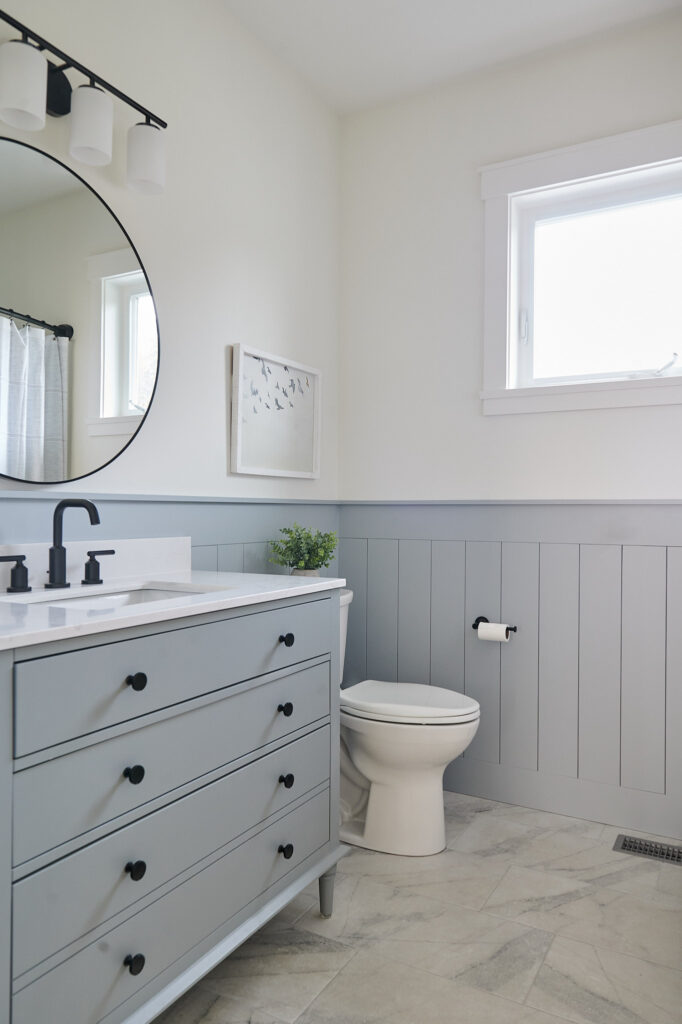
COME TO MOMMA – this bathroom has great potential!
THE CASE STUDY APPROACH
While I can throw one-off ideas at you, one of the best ways to show you a wide range of ideas and options is to do a case study of several bathrooms.
Not all of these bathrooms will be just like yours, but the IDEAS and tips can still apply!
FUN FACT: The average blog post takes me 5-10 hours to write, depending on its complexity. Blog posts like this get closer to 20 hours – I LOVE WHAT I DO!
For those who have their bathroom featured in this blog post, I’m unable to offer any more complimentary advice on your projects, other than what’s been offered below. Hopefully, the ideas are accepted in the spirit they’re given and get you and other readers off to a good start! If not, you’re welcome to hire me for a Paint Color Consult!
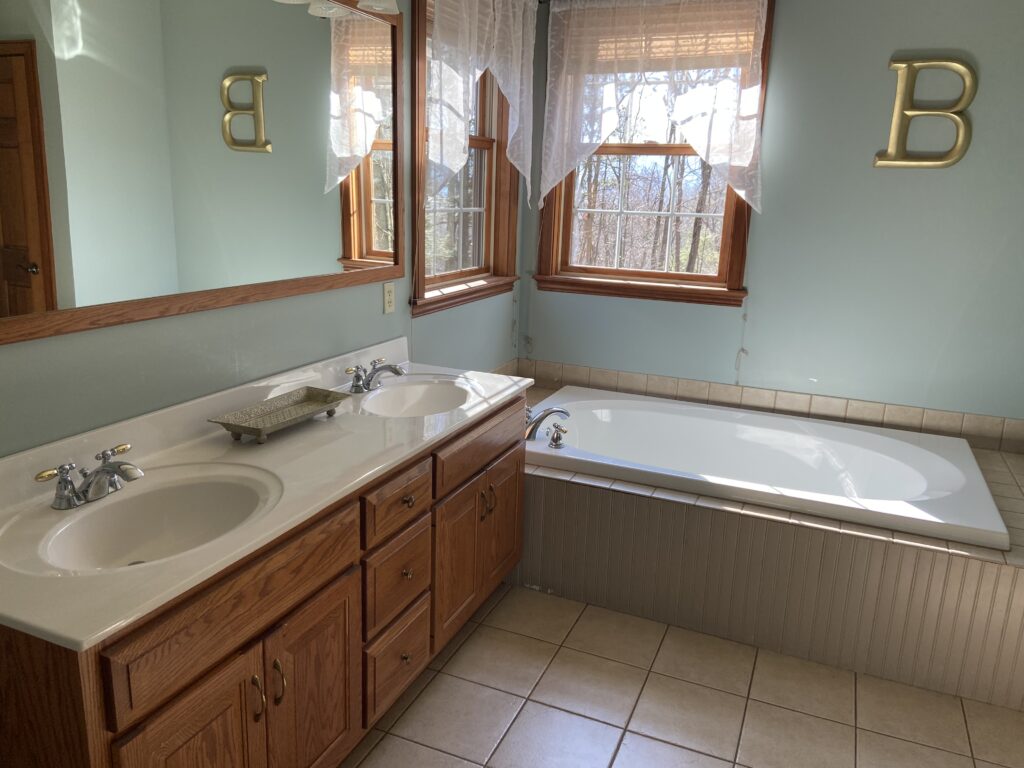
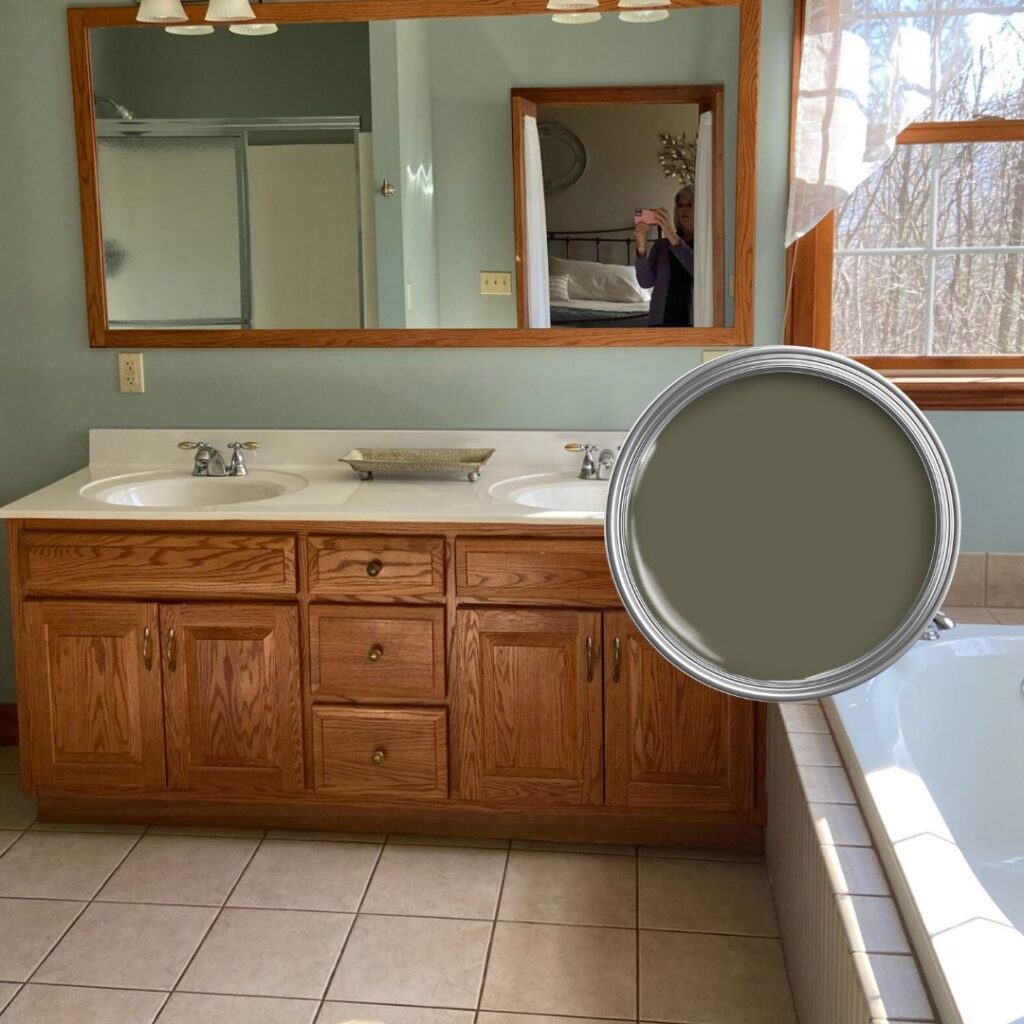
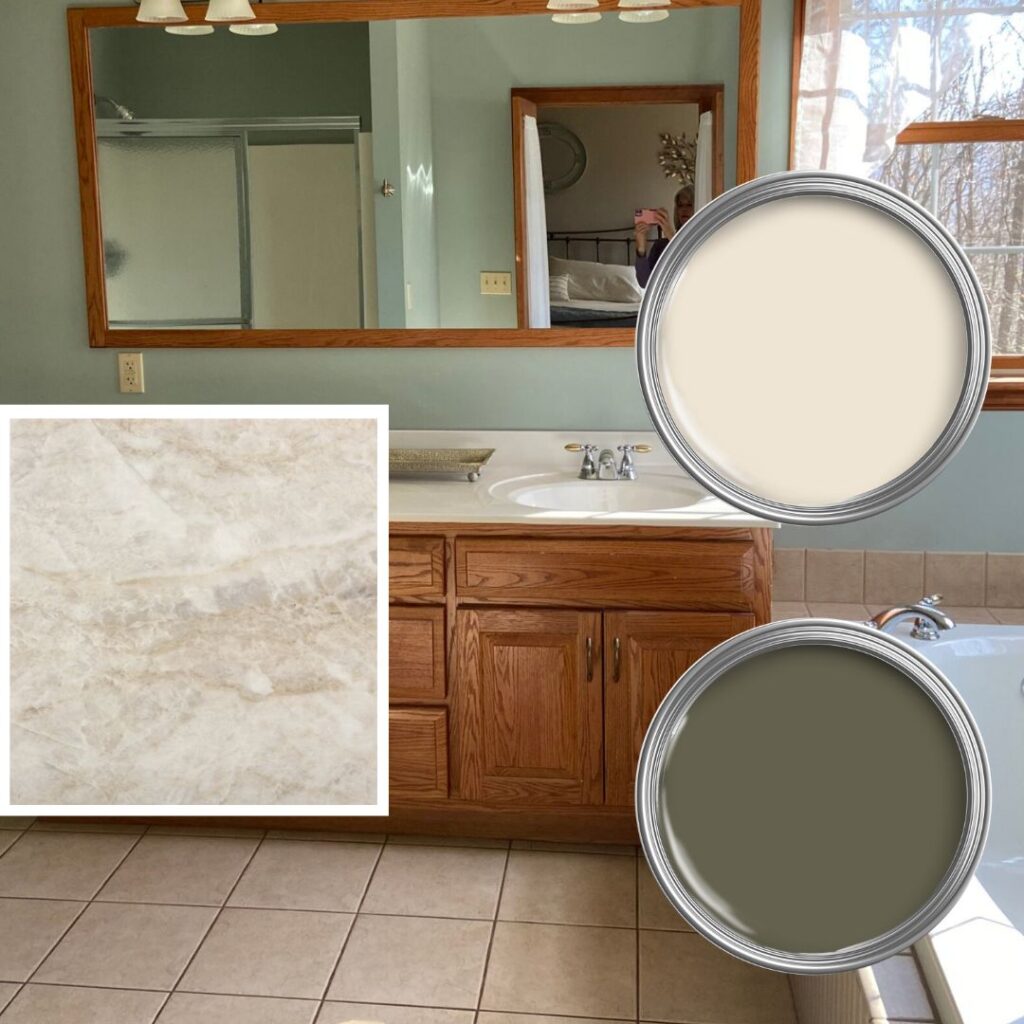
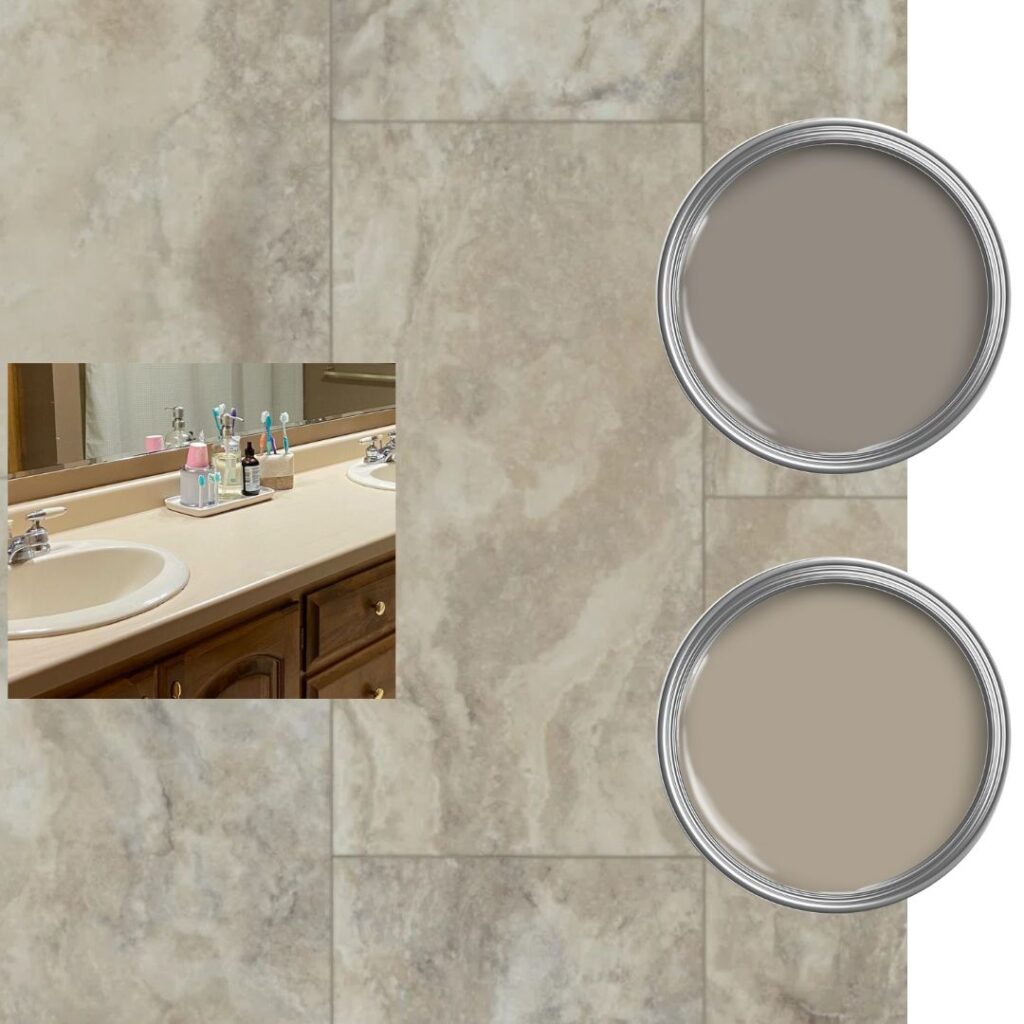
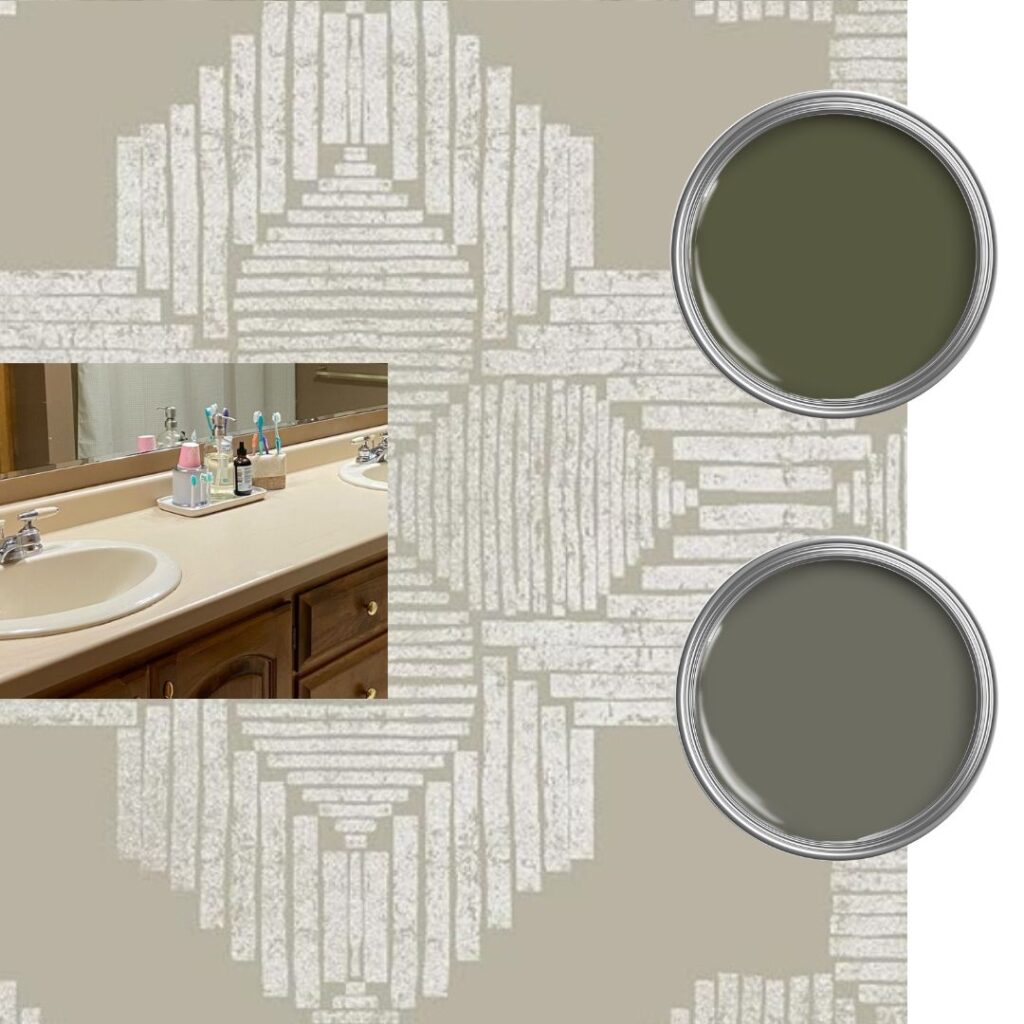
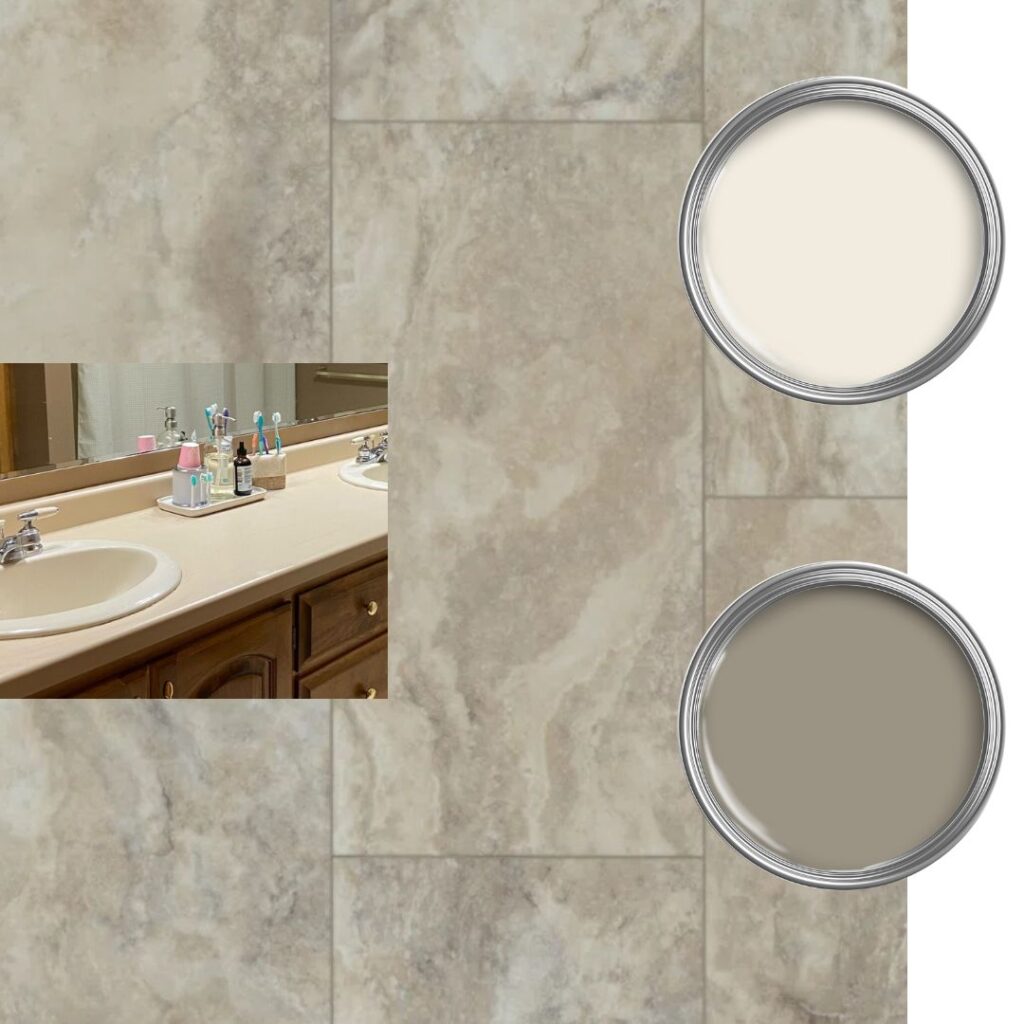
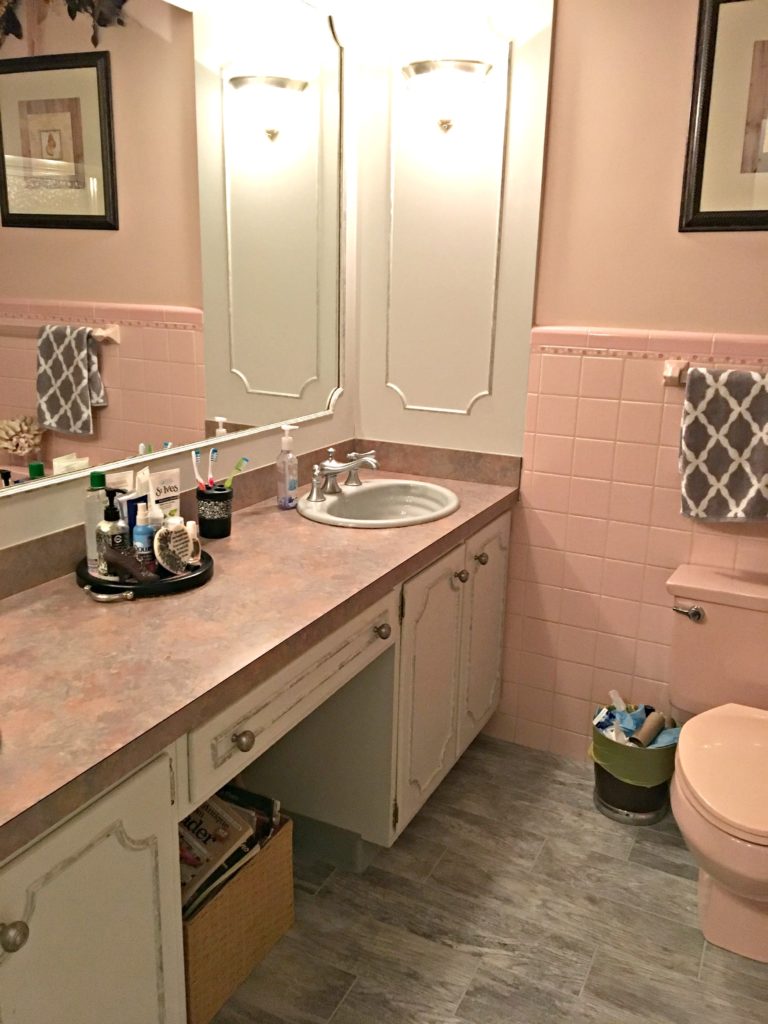
1. OAK VANITY, BEIGE TILE, CHROME, & MORE
While that’s just a small list of this first bathroom’s finishes, it covers the main points. The great thing is that a lot of the bones in this bathroom are solid. Now, this doesn’t mean everything should stay as-is, but there’s great potential for improvement…
When my readers/followers sent in photos, I asked them what they could/couldn’t update. This gives me GREAT guidance for ‘how far to go’ (although my hubby says I ALWAYS go too far…). For the above bathroom, here’s the wishlist…
- Wall color & vanity color – replace the vanity/stain it/paint it?
- Countertop and sinks.
- What should happen with the beadboard on the front of the tub?
- Mirror, faucets, towel bars, and light fixtures are also up for grabs, if necessary.
But most importantly, here’s what they can’t update at this time.
- Tub
- Tile
- Shower
I just love this list because it’s so real…
Real people, real homes, REAL BUDGETS!
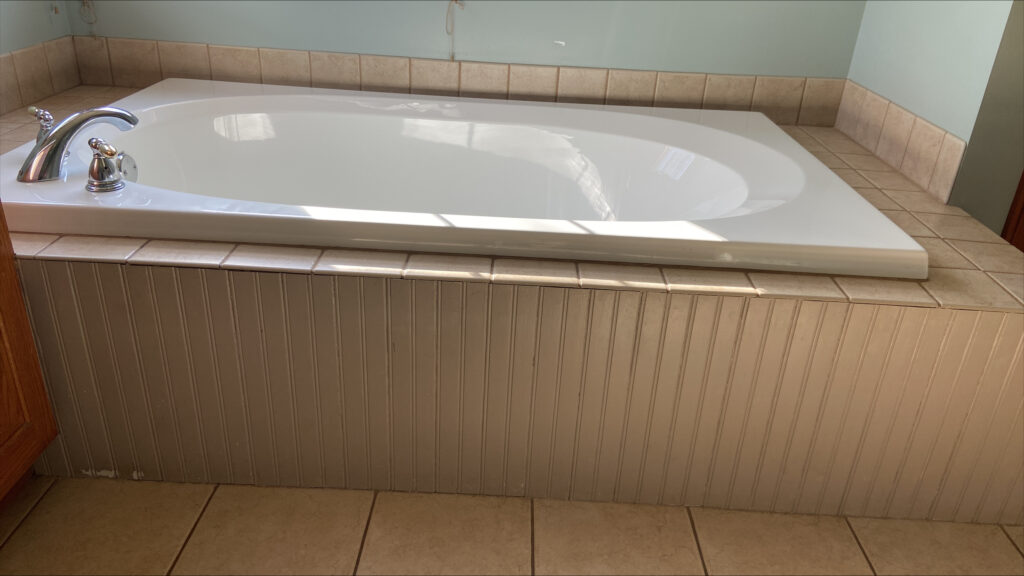
1. BEADBOARD ON THE FRONT OF THE BATHTUB
Soaker tubs with a tile deck around them were super popular in the 1990s and 2000s. And while you’ll still find them in the odd modern home, it’s more common to see a freestanding tub.
To start, look at the style of the doors on the vanity (below) and compare it to the beadboard detail. Notice how the beadboard seems too small and fussy for the scale of the vanity door profile. It’s also too busy considering the 6×6 tiles around the tub and the 12×12 floor tiles – a lot is going on.
Ideally, this would all be tile, but I’m going to safely assume there’s no tile under that beadboard and it’s probably ‘well-secured’. I also wish there were a bit more of a tile overhang on the top, but again, when you’re remodeling, sometimes you get what you get and you don’t get upset (other than twitching and crying for a few minutes with a funnel and a bottle of wine – that’s always allowed).
It would be great to have a nice smooth front either stuck over the beadboard or in place of it (if it can be removed). Here’s the idea that’s in my brain. It picks up on the style of the vanity and isn’t too fancy for the average DIYer.
However, that can be ambitious for many. If so, add a top horizontal molding where it buts up to the tile on the tub deck, as well as a baseboard. Then, add vertical shiplap moldings, approximately 6″ wide to completely cover the beadboard (this is the basic idea).
I only use photos from my readers and Online Consulting clients – you won’t find me ‘borrowing photos’ from other creators to sell my own ideas (hence the links to their sites/Pinterest to see their photos in person)!
The top ledge is nice for this application, but not for the bathtub skirt.
While it isn’t around the tub, in one of my bathrooms (above) we put the horizontal moldings on first and then fit the vertical boards between them so there isn’t a baseboard ‘ledge’ to collect dust. Notice how the boards are the same depth from top to bottom (aside from the top, decorative ledge).
If the homeowners choose to do something along these lines, they’ll have a tub skirt that’s more proportional and better suited to the finishes around it. This means we can move on to COLOR!
2. PAINT THE VANITY & TUB SKIRT THE SAME COLOR
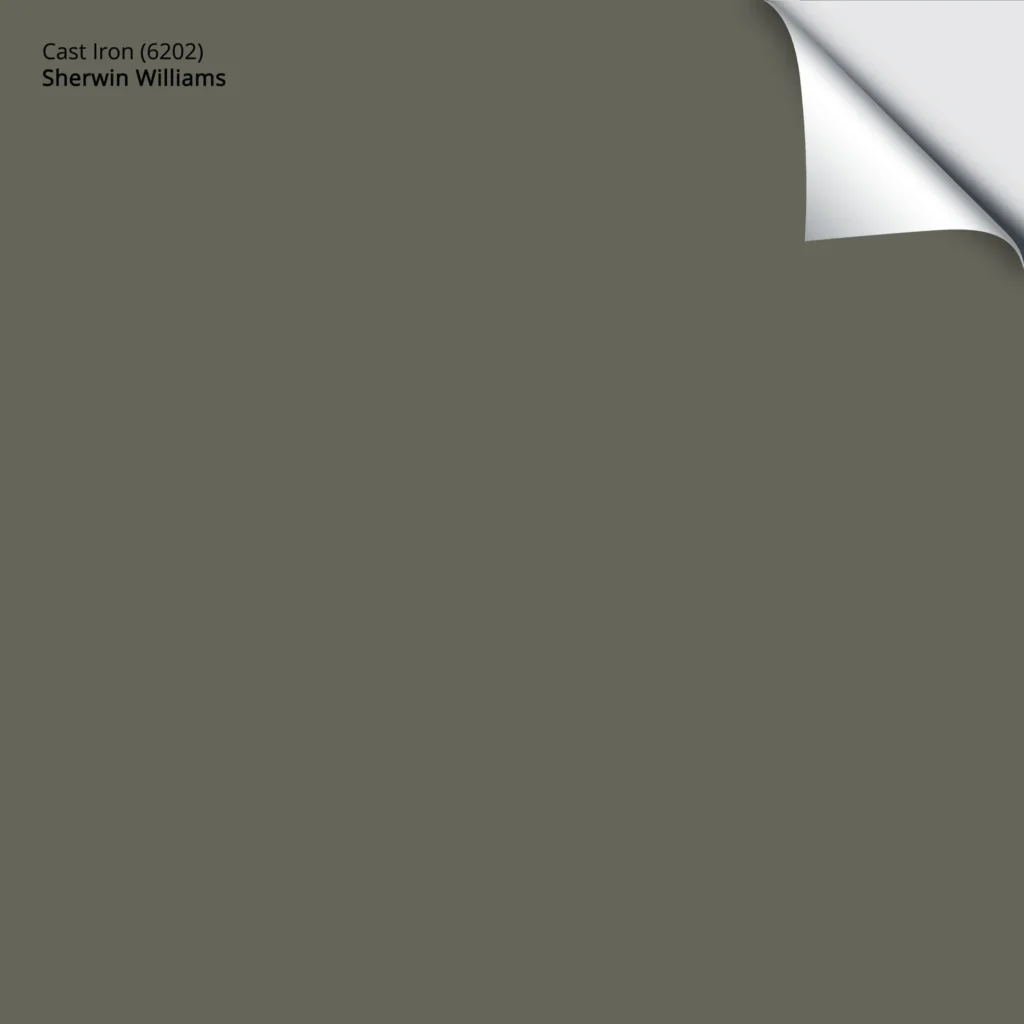
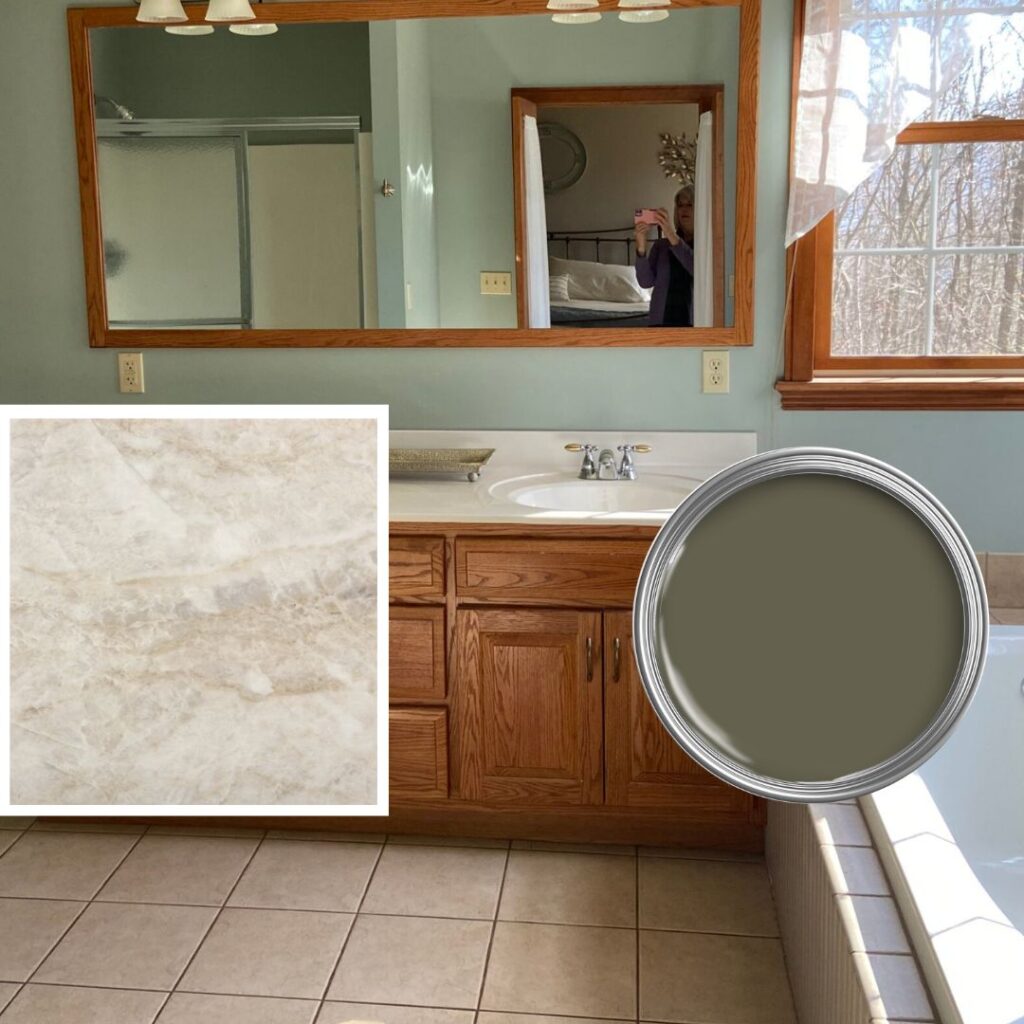
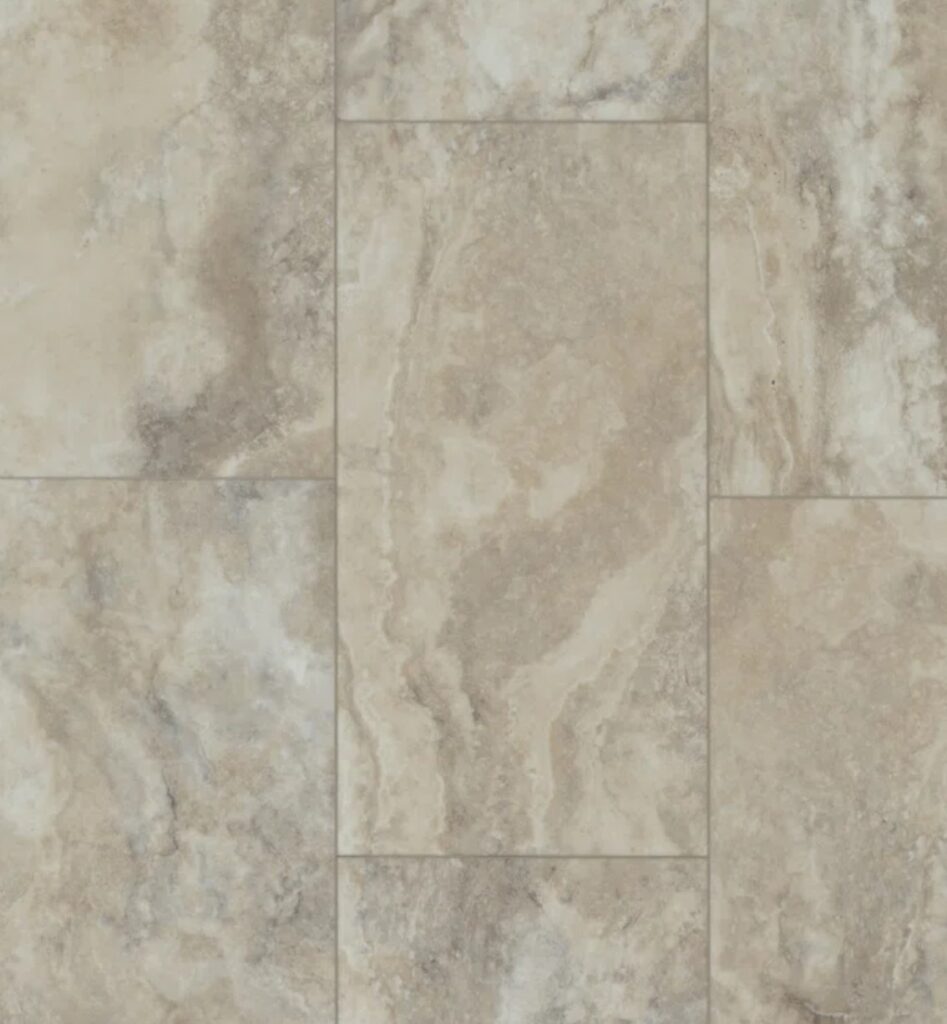
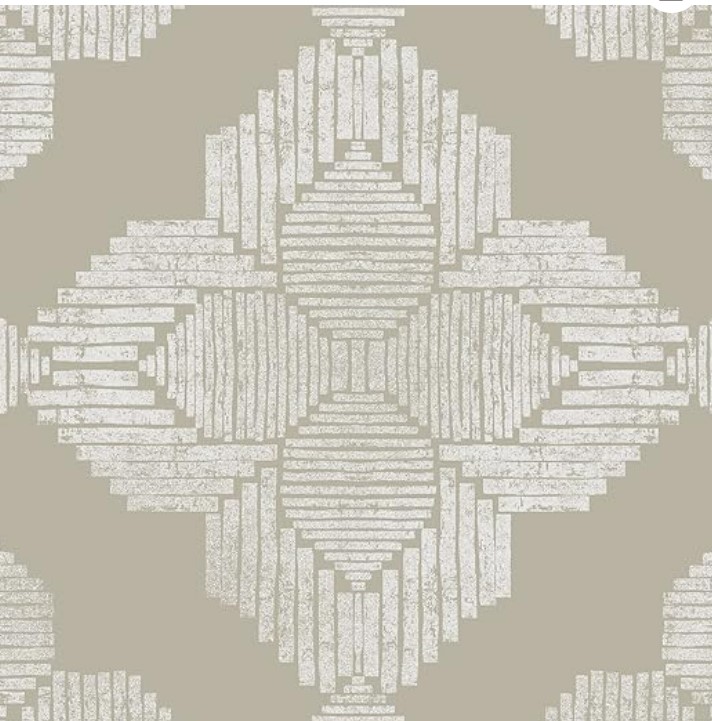
Seeing as the tile is staying, we need to go with it and find colors that coordinate. I would lean into medium to medium-dark shades of green (COLOR BUNDLE HERE) for an organic, natural look. I’d also check out Sherwin Williams Cast Iron, as greens like this can be pretty with beige tiles. A lot of people lean into blue, but it can look a bit more forced if not done carefully.
Beige tiles and finishes often cater to green hues over blue.
Samplize PEEL & STICK (is amazeballs)
3. COUNTERTOP & SINK UPDATE
It’s time for the sinks to stand on their own. I mean, not literally, but the day of the integrated sink has passed (with a few rare exceptions).
The challenge with beige tiles is that they don’t humor many modern countertops – sometimes you can only stretch a space SO FAR into today’s updated finishes. They might need to hit the likes of Cambria Windermere, or something like Dekton Arga by Cosentino. There is the odd soft white quartz with some brown-beige in it, but you gotta go lookin’.
If you have beige tile, find a countertop with some WARMTH in it.
Is a beige countertop your DREAM COUNTERTOP? Maybe not, but if you can’t update the surrounding finishes, sometimes you have to find that happy medium! Besides, did you know that trends (including countertop trends) are leaning warmer than they have for over a decade?
The Best Quartz & Quartzite Counters for WARMER Trends!
4. PAINT THE WALLS & TRIMS
I’m a HUGE fan of wood cabinets and trims, but it’s all about the right wood in the right place (I’m always telling the hubs that – whoa whoa, NOT the right place for your wood, buddy!). On their own, the vanity and trims are okay, but combined with the beige tiles, they can look dated.
In other words, it’s probably time to paint that wood trim.
But first, we need to choose the wall color, specifically, more modern, updated shades of beige. Beige has a bad rap, but today’s beiges are pretty friggin’ fabulous. Any number of off-white beiges would be nice in this room. Too dark of a beige will blend with the tile and backdate the room. BEIGE COLOR BUNDLE HERE.
If you’re wondering about these ‘COLOR BUNDLES’, they’re sets of CURATED colors, from each color group, that Samplize and I created to make YOUR sampling and comparing easier and more fun!
This isn’t the same bathroom (below), but it shows Sherwin Williams Moderate White looking great with the beige tile…
I’m also a huge fan of Sherwin Williams Aesthetic White (as many of you already know)…
I even chose a soft, subtle beige floor tile for our home – BEIGE IS BACK, BABY!
For the trim, off-white beiges often like themselves lightened by 50%, otherwise Sherwin Williams Pure White is often the next best choice.
Check out my favorite off-white beige paint color collection.
5. FAUCETS, HARDWARE, & LIGHTING
Yes, yes, and yes. I would update all of these in this space. Now I can’t fix ALL of a bathroom’s challenges in one blog post – we’ve got more bathrooms to cover, but for this space, gold/antique brass clashes with the orange-pink tones of the tile. Oil-rubbed bronze is too dated. Black is too harsh. I would probably do a nicely polished nickel.
OOO, I’d also take off that mirror and get one cut that goes to the countertop (mirror/glass suppliers can cut out a spot for the outlets). I might also get it made taller, so it’s a bit higher than the light fixtures – so the lights sit on the mirror, rather than above it.
DONE – MOVING ALONG!
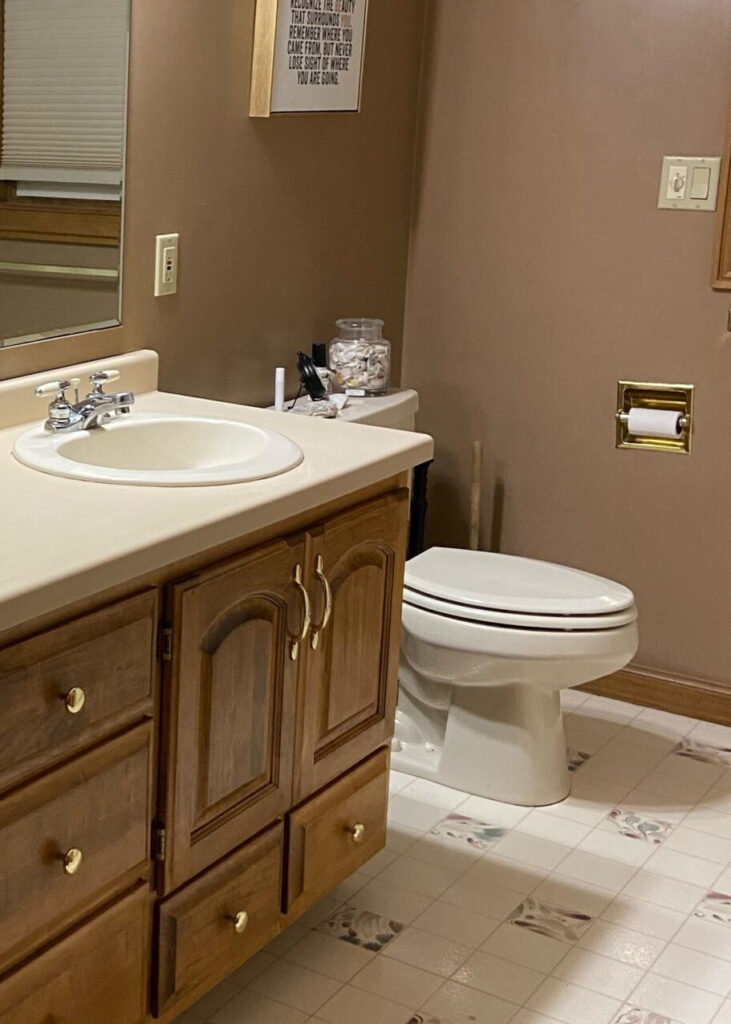
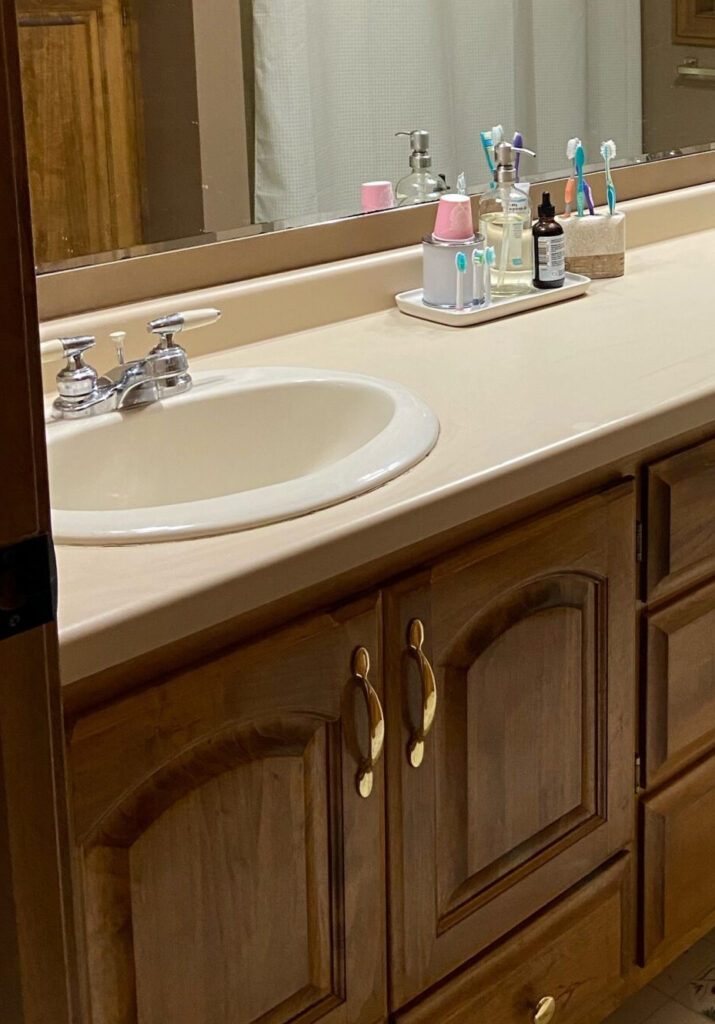
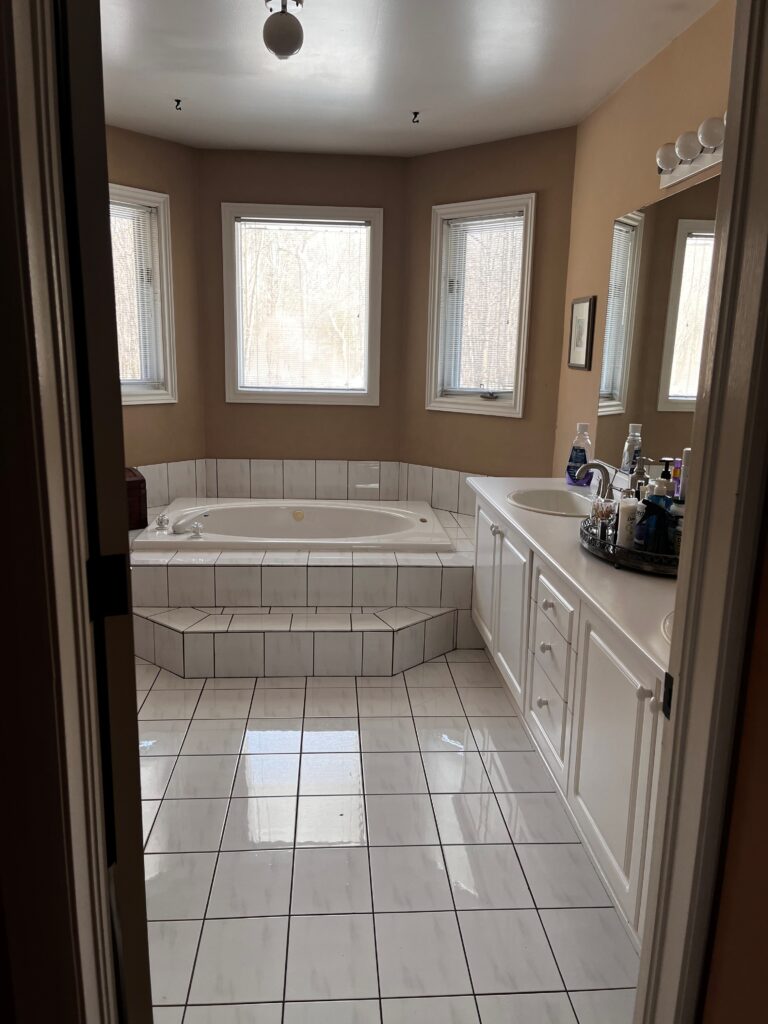
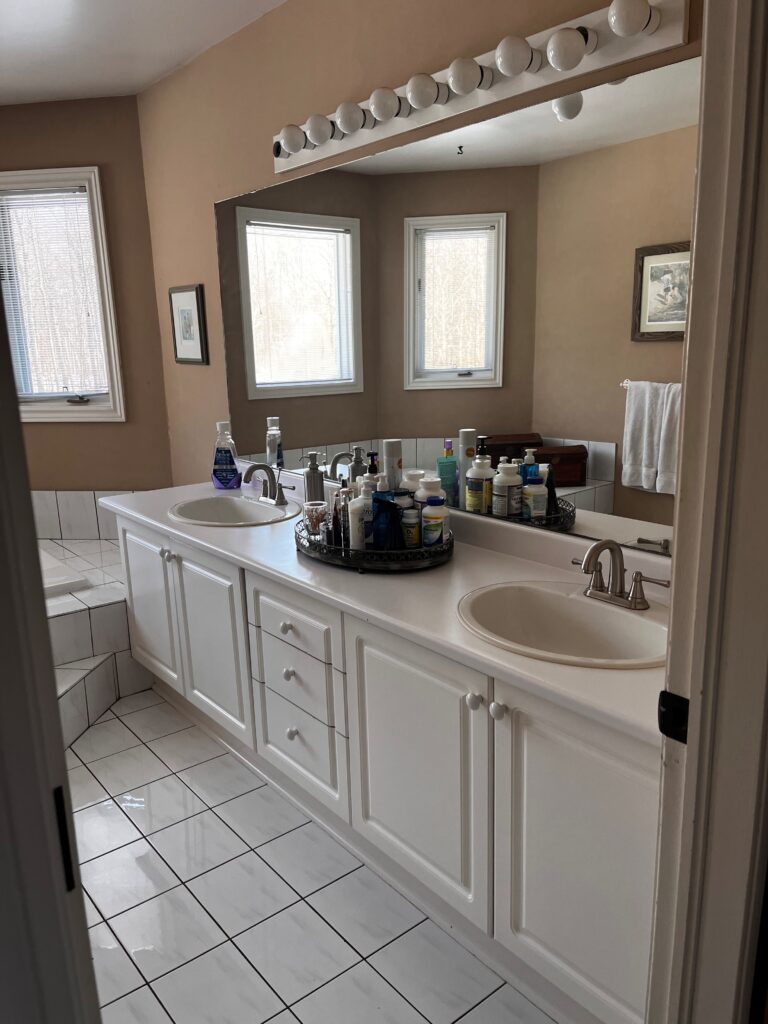
2. LINOLEUM, DARK WOOD, LAMINATE COUNTERS, & MORE
This bathroom had me at hello. I’ve lived in 22 homes in my life (crazy but true – I was a bit transient when I was younger), and I recognize this vinyl from one of our homes (although it might have been in the kitchen – I’m sure my Mom will let me know).
But not only that, this bathroom has a relatively typical layout of a ’90s bathroom and has some faaaabulous friggin’ bones – just look at her…
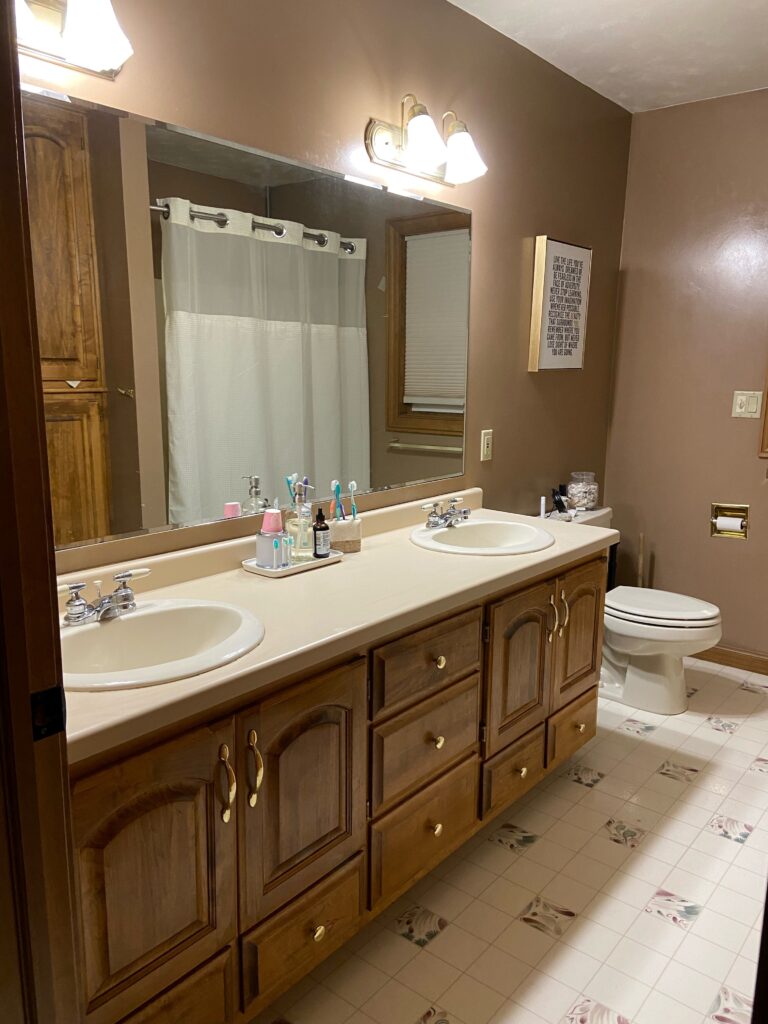
You might be like ‘Ermmm, Kylie, I see heavy dated wood, laminate counters, off-white sinks, and vinyl – whoopie ding‘. Oh yes, you might see that, but I see potential.
Here’s the wishlist I was given…
- New hardware, faucets, and lighting.
- Can the floor be saved? That would be ideal. It’s warped in spots and she’s afraid of what’s underneath (where I live, we have to test for lead on homes this age – ooof).
- She’s open to painting or keeping the vanity as-is, but it can’t be replaced.
- Paint color for the walls and trims.
WHAT HAS TO STAY?
- The almond-bone sinks, toilet, and shower surround (as if you change one, you usually need to change the others).
- The bones of the vanity.
- Countertop.
Heck yes, LET’S DO IT!

1. VINYL FLOORING UPDATE
First off, can the floor be saved? I mean, sure, I can suggest colors that will go with it, but because of the style of this vinyl and its pattern and colors, it will always look 1990s – I can’t update it #SAVETHEWHALESINSTEADOFTHISFLOOR.
But all isn’t lost! Depending on how DIY-friendly this homeowner is, there are some seriously affordable options.
PAINT THE FLOOR A NEW COLOR OR PATTERN
Painting your vinyl floor is an affordable and IMPACTFUL way to update your bathroom on a budget. Heck, tons of people have even painted their shower tile! For some inspiration check this out – painted floor & painted shower tile – FABULOUS!
I did this in one home (many moons ago) with great success. Scuff sand, high-adhesion primer, porch & floor paint – you can walk on it after a few days, but it needs three weeks to properly cure. Is this a ‘forever and ever amen’ solution? Nope, but it’s a ‘good for now’ one! For more inspiration, click here.
INSTALL LUXURY VINYL TILE OVER THE VINYL
While you’ll want to glue down any lifted areas and might need to do a bit of leveling, homeowners all over the world have fallen in love with LVT. I’m going to assume this home could have a beautiful wood floor outside the door, so I wouldn’t butt a fake wood LVP up to it. Instead, go for a tile look in 12×24 or 18×18.
But what COLORS would look good? To figure out what will update your room…
Don’t look at your tastes, look at the existing finishes that aren’t being changed – they’ll tell you what to do.
Because the countertop and almond fixtures are staying, we need a tile that casts a glance at them with a come hither nod. I like the looks of this Palisade tile from Wayfair. They might need a tile with a touch more cream, but online images are the worst and this looks pretty close…
Always get samples and see how they sit with your finishes before ordering a whole whack.
Is it a super trendy tile?
Nope, instead, it’s a great happy medium that suits the existing finishes while helping this bathroom look more modern via the tile size and versatile color blend. If this one weren’t a 12×12, I’d like it too – great colorway.
This next one is pretty badass too. A bit retro? Yup, but I dig it as it has some personality. While it’s a 12×12 it doesn’t matter as the pattern takes over…
SULLIVAN CREAM TILE from Amazon
And while it seems pricey at $13 sq ft (and it is) if you do the math on this bathroom and consider no tile install and minimal mess, it’s pretty appealing.
You could also get a similar stencil and do the same color for WAY LESS.
2. PAINT THE VANITY
In many of my recommendations, you’ll see that the hard finishes are chosen before the colors. Whether it’s a new countertop, flooring, or tile, it’s often easier to pick these first and THEN see which colors coordinate.
If we base this bathroom on the first tile we looked at, I’d consider a nice medium-depth shade of taupe for the vanity. White will be WAY too stark for this room and there’s already enough almond going on.
Learn about some of the best darker shades of taupe HERE.
And of course, it’s important to not pick the first color you see – COMPARE COMPARE COMPARE.
As for the patterned LVT that we looked at, I still love a darker taupe but would entertain a dark green or dark shade of greige as well…
See my favorite collection of taupe paint colors!
See my favorite collection of dark green paint colors or dark shades of greige!
As for the walls, let’s get our eyeballs on this bathroom again to refresh ourselves…
BTW, for the built-in butt-wipe niche, I’d get a nice decorative square piece of molding with sloped edges (so it’s not just a hard square). I’d glue it over that opening, paint it the same color as the wall, and put a normal TP holder on it. Ideal? No, but ideal involves drywall and mud and nobody wants to do that.
Back to the paint colors, coordinating with almond and bone fixtures is always tough. I can see here how the countertop has a bit more yellow-beige in it compared to the bone of the fixtures (I find it funny that I typed ‘boner’ first, as usual). Anyway…
It will be tough to make the countertop and fixtures happy with one magical paint color. I’d likely sample this range of off-white beiges and warm neutrals (COLOR BUNDLE HERE) to see which settles the best between the different needs of this space. For the trims, I would take my wall color and lighten it by 50% and 75% and see which version is best (‘regular white’ is too stark for this bathroom).
Contrary to some beliefs, lightening or darkerning a color can work like magic. While it technically creates a ‘new’ color, it can be a great way to create a tone-on-tone look. But it doesn’t work with ALL colors; double-check that you like the combo you’ve created!
This homeowner specifically hoped to get Sherwin Williams Sea Salt in the mix. However, warm finishes like these fixtures/countertops don’t love being partnered with colors that are cooler AND lighter than them – and with how organic/earthy these are, even cooler and darker has to be done carefully. With the existing finishes, Sea Salt would make them look more dated, rather than UPDATED.
It’s better to go with your home than against it.
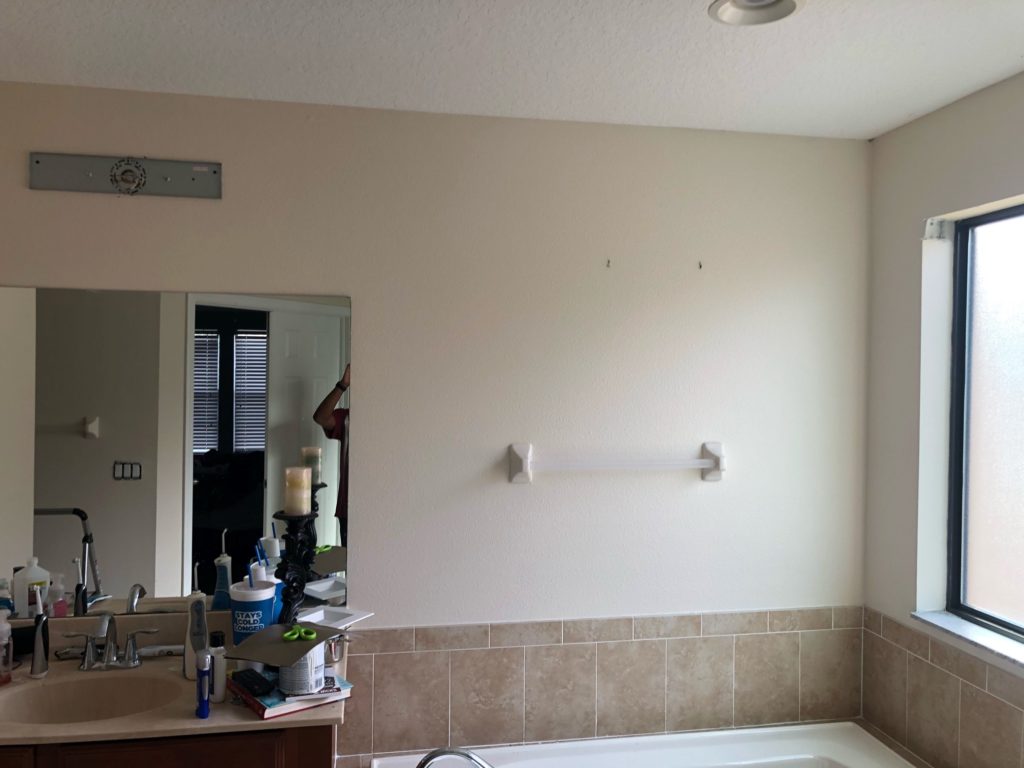
This next bathroom is my outdated (but still GREAT BONED) 2000s bathroom with its original color…
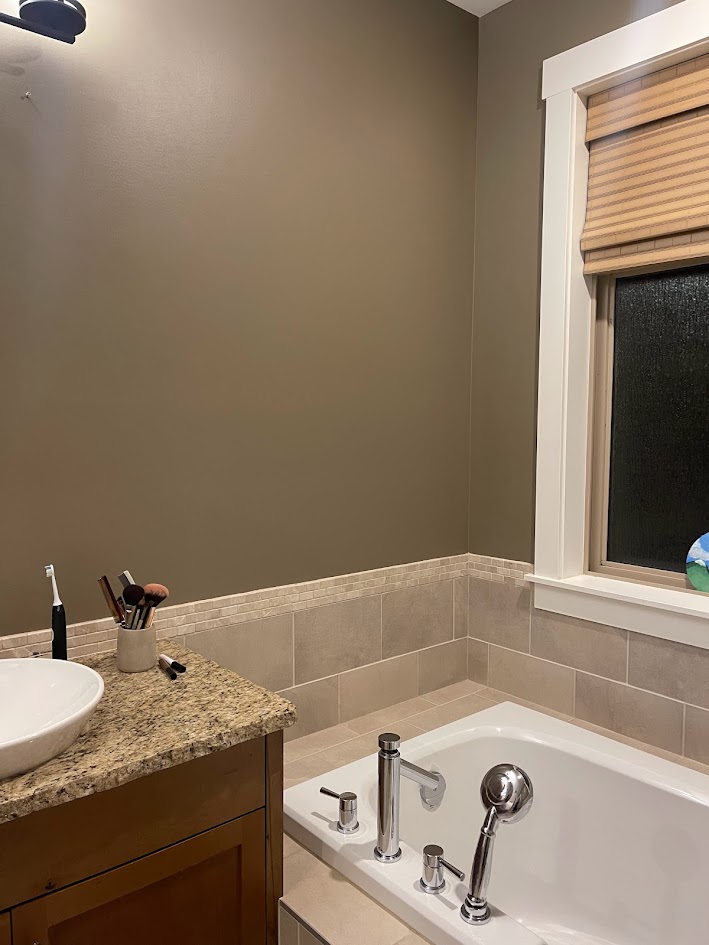
We’re remodeling it in a few months, but before Christmas, I wanted to lighten and brighten it. And it didn’t matter if I wanted blue or green walls, my bathroom has it’s own set of wants and needs…
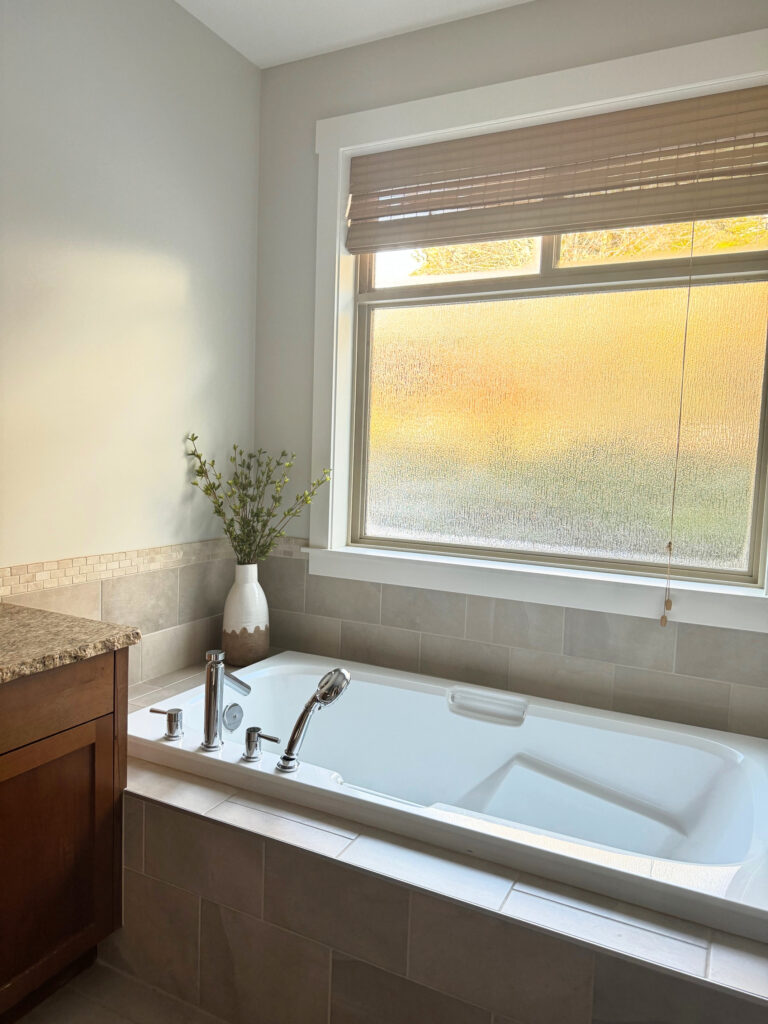
Instead, I painted the walls a soft shade of taupe – Benjamin Moore Pale Oak (it’s only the reflection making it look slightly green in the lit area).
Do I like taupe or pink undertones? HECK NO, but my bathroom sure does and because it looks good, I’m happy with it!
Now, back to our ’90s remodel…
3. HARDWARE, LIGHTING, & FAUCETS
Given the warmth of the bone finishes, I’d LOVE a nice antiqued gold/brass, but finding a budget-friendly one isn’t easy. My next thought is still gold. Even though it will pop quite a bit on that countertop/sink. Because of that, I might try for a brushed gold/champagne one, so it’s not as vibrant. The shower likely has gold fixtures and it’s nice to keep that consistent without having to update EVERYTHING.
As for the style, notice the oval shape of the sinks and the curve on the vanity doors.
The shape of your existing fixtures could guide you towards the shape of any new fixtures.
Any fixtures chosen for this bathroom should have soft curves – no straight, clean lines. I mean, sure, there’s the odd straight line, but the BODY of the piece should have a nice curve to it (like me). Let me see if I can find a good faucet to get them started. Ya, something like this is the right idea…
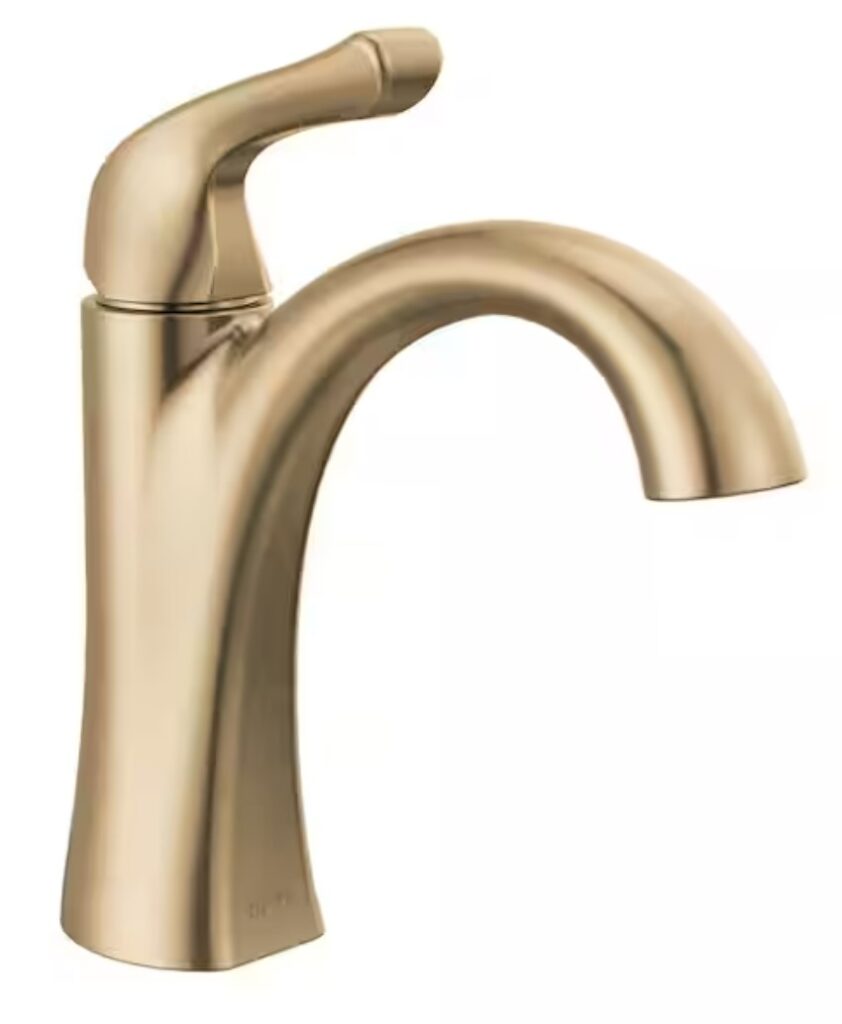
From there, coordinate the hardware to have similar, simple lines – the same goes for the light fixtures.
Again, I can’t touch on EVERY part of EVERY bathroom, but these ideas should get the creative ball rolling!
NEXT!
We’ve hit two wood-inspired bathrooms, so let’s look at something a little different.
3. THERMOFOIL, 8X8 TILE, & LAMINATE COUNTERS
Let’s take a look at another 1990s bathroom and use the previous tips to see what we can do…
If we tackle the tile floor, tub surround, and shower (which we can’t see), we’ll be doing a full remodel on this bathroom, which isn’t what this blog post is about. Instead, let’s keep some of the bones and work some magic on this bad boy…
FINISHES THAT ARE STAYING
- Tiled surfaces.
- Vanity.
- The faucets COULD stay, depending on where things go with the lighting.
Now, let’s see how we can update these ’90s bones…
NEW COUNTERTOP
While we’re saving TONS by leaving the tile and the vanity base, a new countertop will go a long way to refreshing this space.
Based on the needs of the tile floor, I’d check out something like Formica Jet Sequoia, which is a black, marble-look laminate countertop. This picks up on the dark grout and gray tones in the tile floor. It also grounds the space compared to the current white-on-light palette.

The New Era of Laminate Counters & Why They Rock
PAINT THE VANITY & THE WALLS
I’m guessing these are thermofoil cabinets. Thermofoil only lives so long until the glue releases and the fronts start cracking.
Did you know you can remove the thermofoil from your cabinets?
That’s right, with some carefully applied heat, the adhesive holding the thermofoil on the door releases, letting the top surface go and leaving you with a nekkid cabinet door that begs for paint! (This is probably why Tim is always aiming the blow dryer at my top half on full heat). And while I could get into the nitty gritty here, it’s better to read this first-hand experience from Kelsey.
Once you’re down to the cabinet forms, it’s time to pick your paint color. In the above bathroom’s case, I’d find a mediator between the cabinet and the white tile, perhaps a gray with a blue-violet undertone like Benjamin Moore Trout Gray.
Now, this next image is SUPER FUGLY as I’ve never taken a course in Photoshop (stating the obvious, as if I had, I’d need to get my money back). Instead, I used this basic program just to get your eyeballs on things…
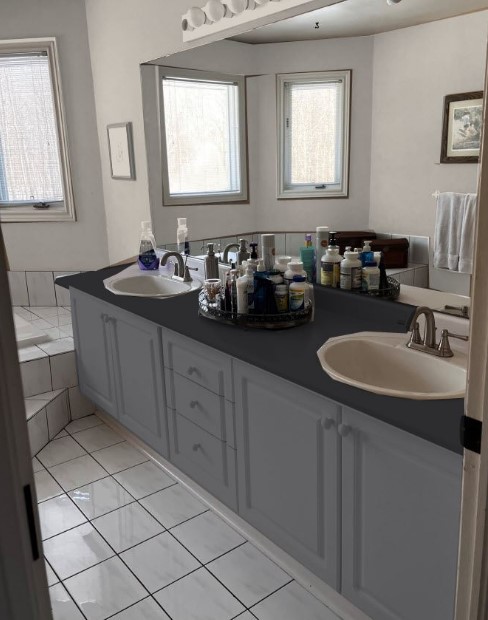
I’m not an AI fan, but I can see how it would be handy for this purpose.
In all its fugliness, you can still see that it’s a great improvement!
FIXTURE FINISHES (FAUCETS & LIGHTING)
For the metal finishes, I’d go for chrome. The floor is glossy and I’d like to pick up on that energy and add some bling.
If the vanity were kept white, we might look at black faucets, lighting, and knobs to add some contrast. The risk is that it will nod that bit farmhouse (which isn’t trendy anymore), so the lines would need to be transitional – not too modern or too curvy/industrial.
4. A BIT MORE THAN A SIMPLE UPDATE
Sometimes you need to make FUNDAMENTAL, large-scale changes to move forward, otherwise, you may as well not move forward at all.
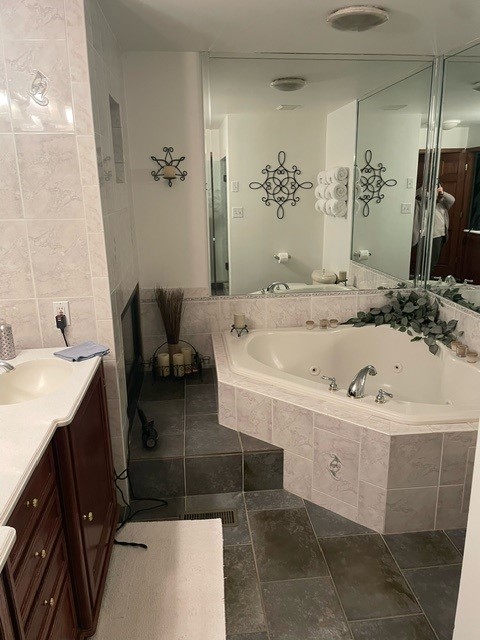
This is the case with this next bathroom. While it has some good bones (tile floor, countertop, and vanity), oooooo boy, look at those wall tiles…
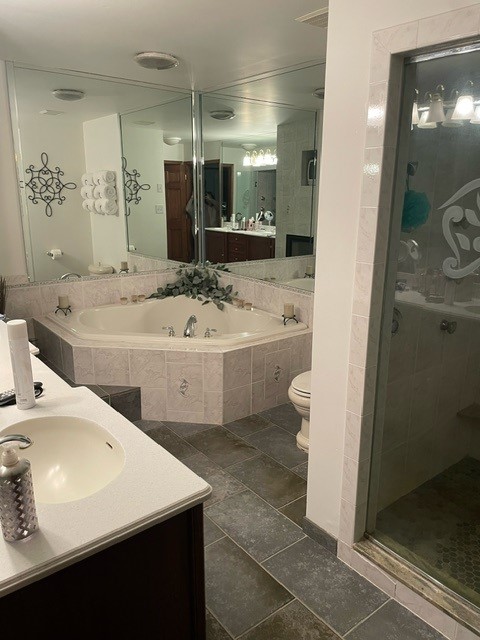
There’s no ‘updating these tiles’ without replacing them, so to save money in this bathroom, it’s about spending money where it counts.
1. DECIDE WHAT STAYS & WHAT GOES
Making a list of your bathroom’s features is a great way to start a project, starting with the non-negotiables…
WHAT HAS TO STAY (OR CAN STAY TO SAVE MONEY)
- The vanity.
- Tile floor.
- Bathtub and its surrounding deck. While we might have tried for a freestanding tub running parallel to the end wall, because the floor tile is staying, we can’t do that.
- I like how the mirror runs full length and height of the vanity – it’s a keeper.
- Because the tub is off-white and not being changed, may as well keep the off-white toilet.
- Again, the off-white countertop/integrated sinks coordinate with the tub/toilet. So while you coooould update them, you’d still need off-white sinks.
WHAT’S GOT TO GO…
- Any of the wall tile around the shower, bathtub, and general bathroom area.
- I’m not a huge fan of full mirrored walls like the ones around the tub (great if you’re Hugh Hefner, I guess). That’s got to go.
- Chrome and gold faucets (which is why this combo makes me twitchy in modern homes – it can look super 90s).
- Light fixtures.
- As for the shower doors, IDEALLY, they’d be plain glass – no etching or chrome edges. Is this a hill I’ll die on? Probably not, but depending on how the budget goes, I’d try to fit a new one in.
- With the new shower tile going in, I’d do new shower hardware.
- The little TV nook – I’d cover over that fo sho.
As for the shower floor, sure it needs to be scrubbed and maybe even regrouted or hit with Mapei Ultracare Grout Refresh, but as long as the waterproofing is still in place, I’d keep it (replacing it is NOT CHEAP OR EASY!). It also coordinates well with the floor tile.
2. COVER THE WALL TILE (NOT INCLUDING THE SHOWER)
Removing tile, disposing of it, and drywalling is a huge, expensive job. Instead, for the wall tiles that aren’t directly attached to the shower, I’d cover those bad boys up.
What can you cover the wall tile with?
- Peel and stick tile – this isn’t a forever application, but it CAN last a pretty darn long time if you scuff sand the tile, clean it properly, and use a quality peel & stick. For this much square footage, I wouldn’t do it.
- Shiplap. While shiplap isn’t trending anymore, depending on the age of a home, it can look better than what’s currently there and much more updated, at least for the next few years.
Now humor me while I explain what I would do…
- Take the wall mirrors off (first I’d do a little dance in front of them, naturally).
- Add shallow shims to build out the upper walls to be the same depth as the lower tiled areas.
- Apply horizontal shiplap (approx 6-8″) that runs from the tub deck to the ceiling, and that joins into the same application on the full height of the TV/fireplace wall. This also means I wouldn’t have to patch the drywall behind the mirrors, which are likely hermetically sealed to the walls and will not be fun to remove.
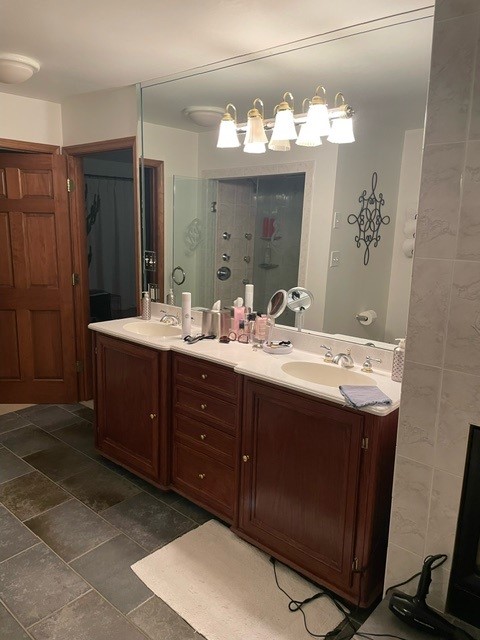
3. PAINT THE VANITY & THE SHIPLAP THE SAME COLOR
By painting the vanity and the shiplap the same color, we’re creating a nice flow between the different finishes and bathroom zones – I love it when a plan comes together (for all you Mash fans).
How do we find our room’s best paint color?
Again, it’s not about our tastes, it’s about combining our ‘wants’ with the very specific NEEDS of our bathroom’s finishes. In this case, we need a color that’s darker than the countertop and the almond tub and toilet, so they don’t compete. Based on these boundaries, I see two great options…
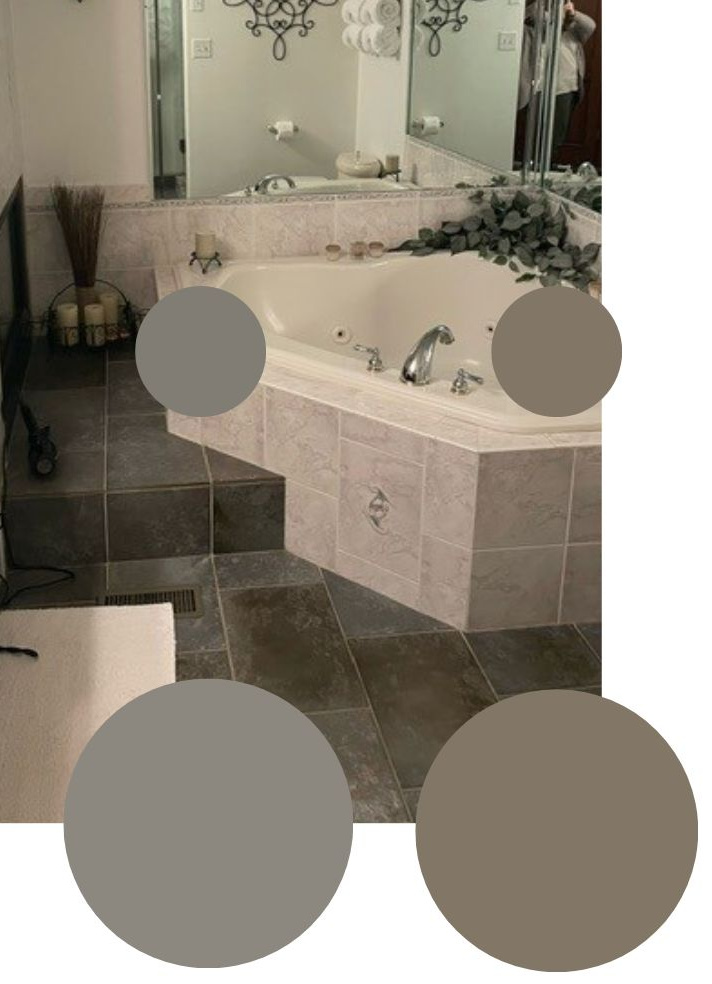
Compare the larger blobs to the floor tile – they’re both contenders. However, the almond bathtub is the dealbreaker as it doesn’t love the degree of violet in the left-hand sample. It responds way better to the brown-taupe look of the blob on the right (blob being a super technical Designer term).
You’ll find colors like the above taupe blob HERE. I recommend these bundles as you can’t pick a color based on itself, you HAVE to compare, compare, compare!
Now, you might be inclined to go lighter, but it was best that we hit some moderate depth. Why? It’s time for a FUN FACT…
Warm colors and finishes (like the countertop in this bathroom) don’t usually like colors that are cooler AND lighter than them.
Learn more about that concept HERE.
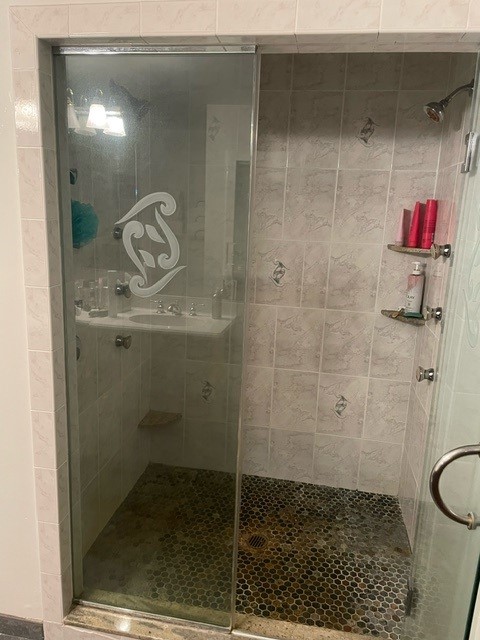
4. INSTALL NEW SHOWER TILE
Now this is where we’re spending some serious money. However, for the sake of this bathroom looking more updated, it’s a great bang for buck. So how do we find the right tile for this walk-in shower?
Take inspiration from existing finishes – don’t surprise them with something out of their comfort zone!
For example, a lot of people revert to white tile, whether it’s a subway tile backsplash or shower surround. However, more often than not, white tile is too stark, especially for 1980s, 90s, and 2000s homes.
Our floor tile tells us that it likes grays with violet tones, as well as a warmer, taupe and brownish tones. I’d find a large-scale tile for the shower walls; leaning into sizes that are beyond the standard 3×6 or 4×12 and upwards of 12×24.
Sure, I love subway tile, but smaller tiles = more grout = more scrubbing of grout lines.
This tile (shown below) is a nice 24×24 with a simple look to it – the floor is already busy enough, so we don’t need a busy shower tile.
Always order one or two pieces to see how they look in person – online images are rarely exact!
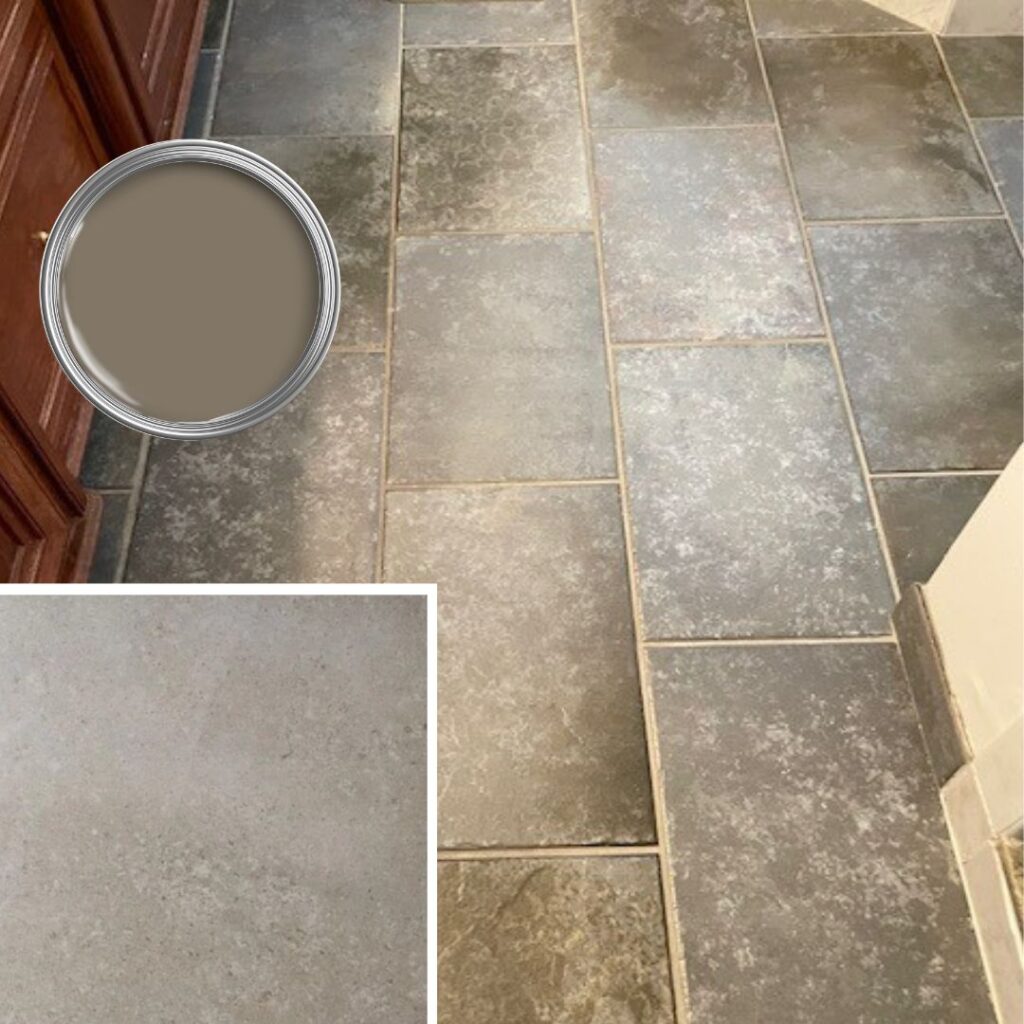
Iris Tortora porcelain tile from Home Depot – I might go a BIT lighter on the vanity/shiplap
Notice how I didn’t introduce anything new to the palette…
I listened to what the existing finishes were telling me.
5. UPDATE THE FAUCETS, HARDWARE, & LIGHTING
If I get into specifics for this bathroom, we’ll be here for days. The idea is to look at your loo’s existing finishes and see what best suits them. For this particular bathroom, here’s what I’m looking at…
- Considering the floor tile and vanity/shiplap options, I’d lean into chrome or highly polished nickel. Black is too harsh, gold doesn’t suit the palette as it’s too warm. Oil-rubbed bronze? Hard no.
- The knobs look too small for the scale of this vanity and not in the right spot. Seeing as the vanity is getting painted, I’d fill the current holes and drill new ones near the top of the doors and install slightly larger knobs. I’d fill the holes on the drawers and install coordinating handles.
- I’d install more modern, clean-lined but slightly curved faucets and light fixtures. While I wanted something a bit more updated, there’s a lot of appeal in this type of light fixture, given its length and that it’s being applied right on the mirror. This is good too – round frosted white shades and an adequate number of bulbs.
Clear glass shades with exposed bulbs can look a little janky when installed on top of a mirror – opt for solid color shades.
- Looking at the curves of the sinks and countertop, I’d do soft-lined hardware vs super square, clean edges. For an updated, more transitional approach (for the above bathroom), my fave handles are numbers 5 and 6 (number 2 is just the black version of number 5. Again, I’d do these in chrome or polished nickel.
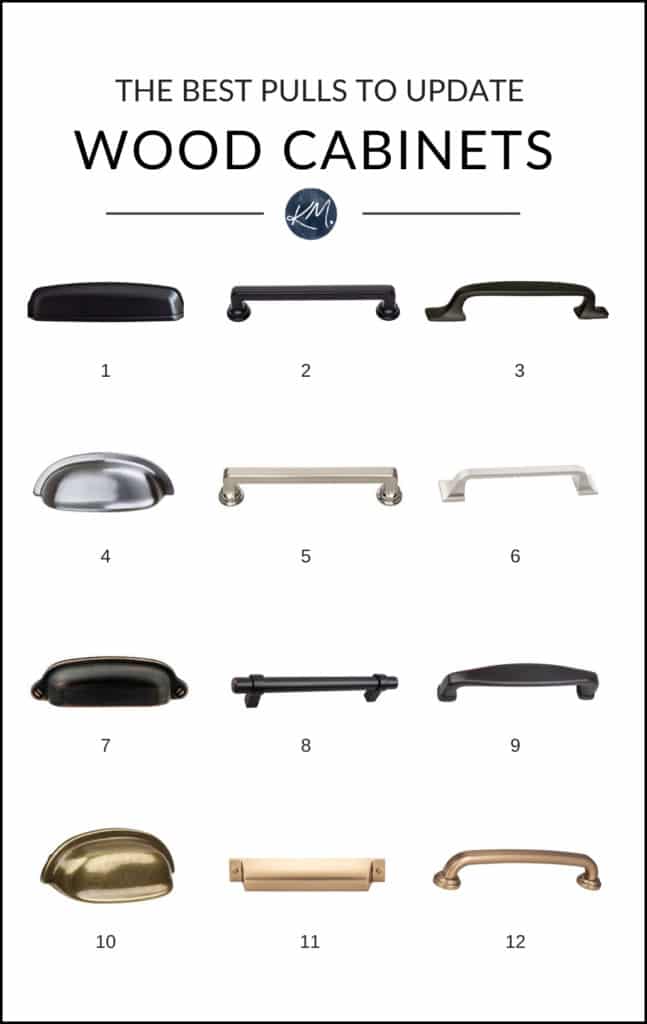
- Cup Pull – Black | 2. Bar Pull – Black | 3. Arch Pull – Black | 4. Cup Pull – Polished Nickel | 5. Bar Pull – Polished Nickel | 6. Arch Pull – Polish Nickel | 7. Cup Pull – Oil Rubbed Bronze | 8. Bar Pull – Oil Rubbed Bronze | 9. Center Bar Pull – Oil Rubbed Bronze | 10. Cup Pull – Brass | 11. Center Cup Pull – Brass | 12. Center Pull – Brass
Truth be told, I’m disillusioned about #8 as it’s quite the pocket-catcher (but you do you, boo).
I wanted to do another case study, but to be honest, I’m mentally and physically exhausted – I pour my little heart into these things! If your home wasn’t featured, be sure to check out the PARTNER POST to see if it pops up!
MORE IDEAS: How to Update Your Outdated 1990s Bathroom
READ MORE
The Best Bougie Laminate Countertops On a Budget
How to Design With Marble on a Budget
The 6 Best Paint Colors for Almond or Bone Bathroom Fixtures
Get the Online Paint Color Expert that DESIGNERS hire!


As always Kylie, your blogs are so insightful, the most practical and so much fun to read! Great Job!
Well, thank you Liz!
I am a fan of hanging art over large mirrors. It takes away the “builder basic” vibe and makes it a bit more David Hicks.
Ooooo, I like this idea!