
A Greige Bathroom Remodel: Subway Tile & More…
When it comes to buying a home, I like to put my stamp on things, and from the minute we bought this one, the bathroom was on the TOP of the chopping block (really, what wasn’t on the chopping block…).
However, because bathrooms can be total pork chops on the budget, I had to bide my time until we were ready to do it right. And even then, I was hesitant to get the ball rolling until Moen sent me an email and said, ‘Heyyyyyy girl, you doing any renovating? We’d love to supply you with some products!’ SAY NO MORE! The ball was OFFICIALLY rolling.
Now, that doesn’t mean that I wanted to blow the bank – I still wanted it to be budget-friendly, so I decided on the following:
- I would keep the vanity. Because it’s built in between two walls, I couldn’t just go to a big box store and get a pre-fab unit that I could drop in – it HAD to be a custom size. So, I decided to get it painted and freshened up with new hardware.
- I would keep the footprint as everything is pretty functional where it is, other than the dead space behind the door (but I figured out something for that too).
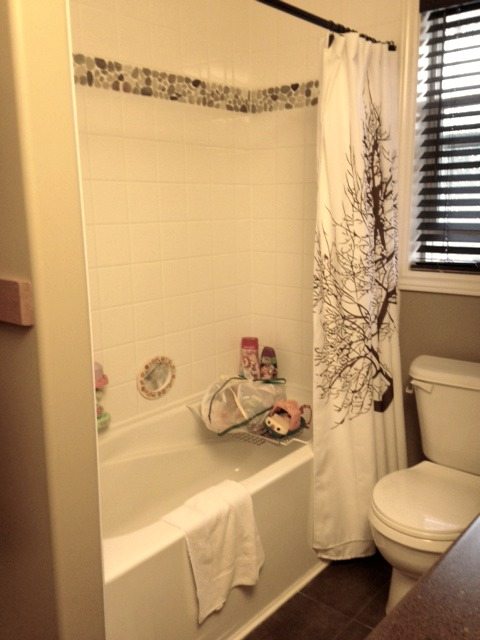
- I would keep the tub. Our home is only 10 years old, and because that shower rarely gets used, the fiberglass tub is in awesome shape.
- I would use and abuse subway tiles. This would keep most of my tile square footage aligned with my budget.
Are you ready, Betty?
Let’s start in the hallway…like most hallways, it’s visually stimulating and an architectural wonder…
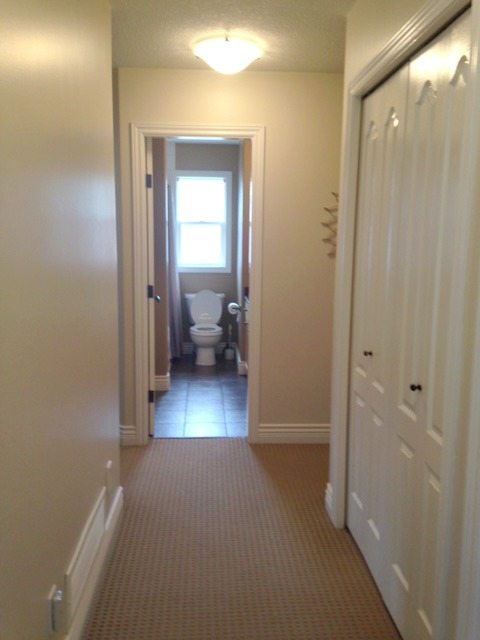
Well, it might still be a basic hallway, but NOW it has some personality via a wicked accent wall and is a great lead-up to the main bathroom!

The Best Hallway Paint Colours
I chose Benjamin Moore Gray for the accent wall, alongside Sherwin Williams Creamy on the main walls. We also installed new flooring (sue-prize, sue-prize). The original carpet was showing its age, so it was time for an update! (and no, the madness never ends)
NOW, on to the good stuff – WINE. Just joking…the loo!
THE BATHROOM AREA
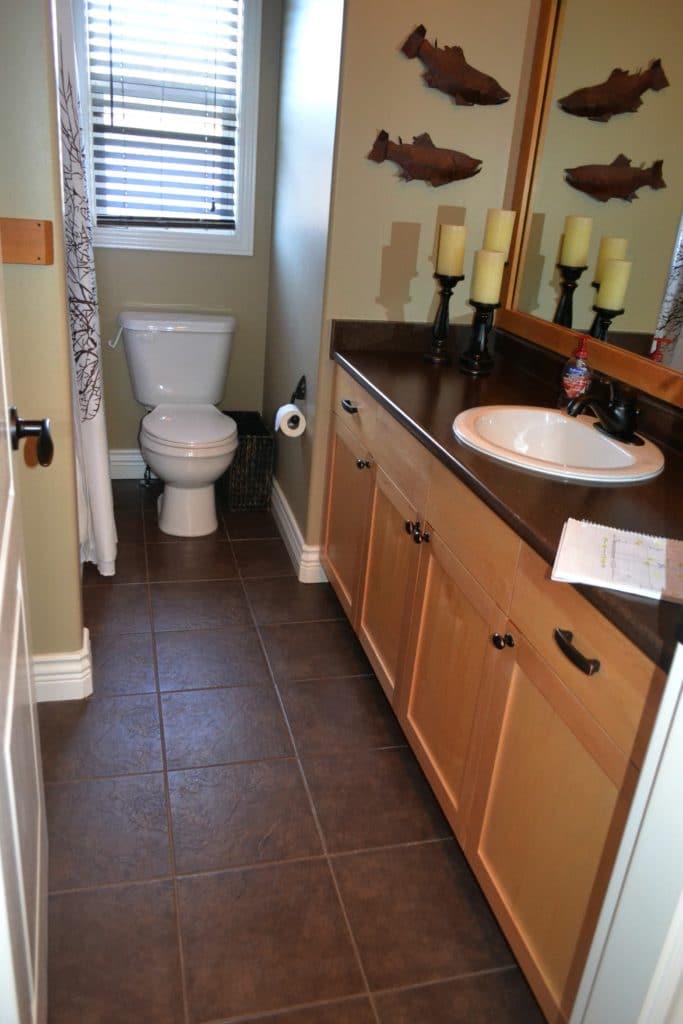
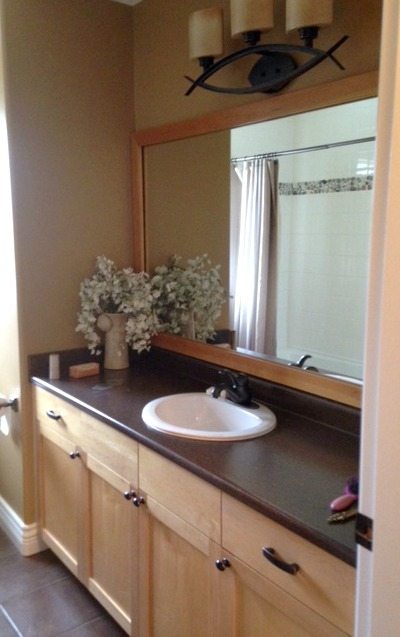
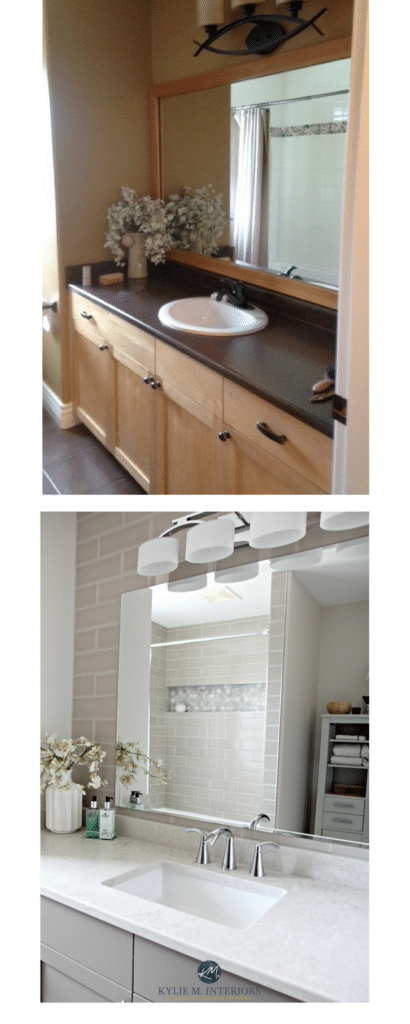
Before, the maple vanity and dark surfaces made this bathroom feel heavy and moody (like me once a month) and didn’t make ANY sense with the shockingly white 4×4 tile in the shower.
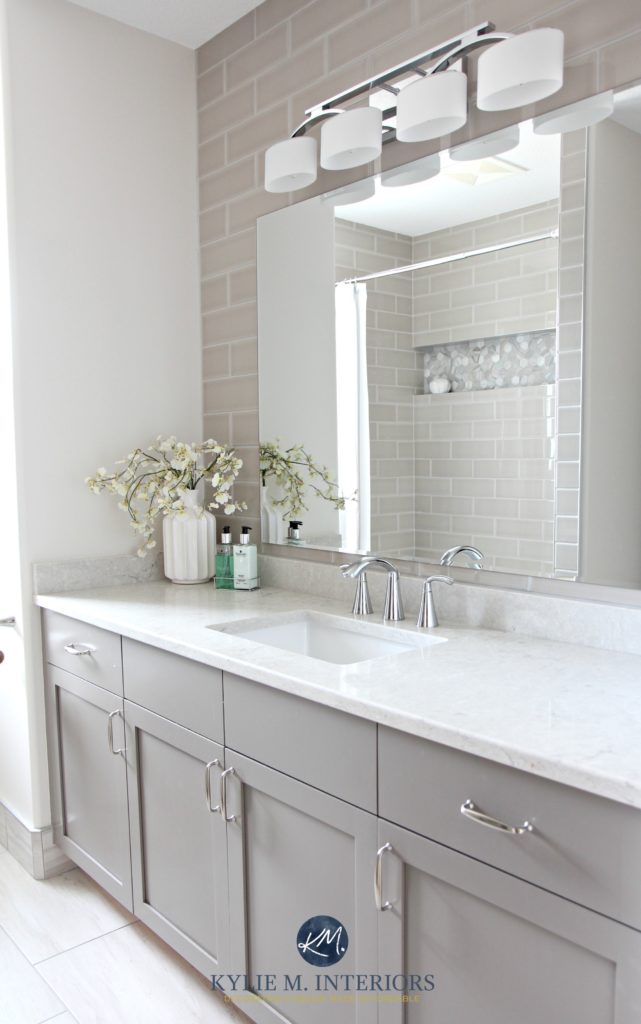
And after…go GREIGE or go home! Maybe I’ll do both, seeing as I now LOVE our bathroom…
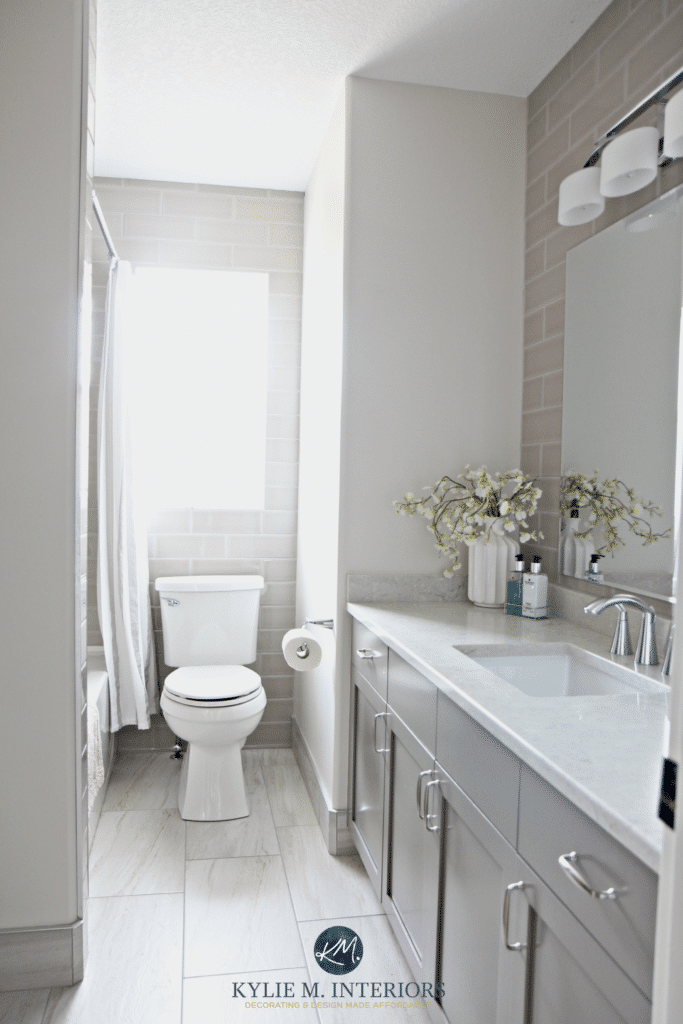
I chose Benjamin Moore Classic Gray for the walls as I wanted a soft, subtle look that didn’t compete with any tilework or countertop. And notice it’s the SAME VANITY, just updated with a fresh coat of paint and hardware!
The Light Fixture, Countertop & Vanity
The old light fixture always made me think of those metal fish you see on the back of cars that say ‘JESUS’ in the middle. Once I saw it, I couldn’t unsee it. And y’all know how religious I am…
I chose Caesarstone Bianco Drift, which is a quartz countertop with warm gray, greige, white, and brown tones (you’ll see this same countertop HERE)…
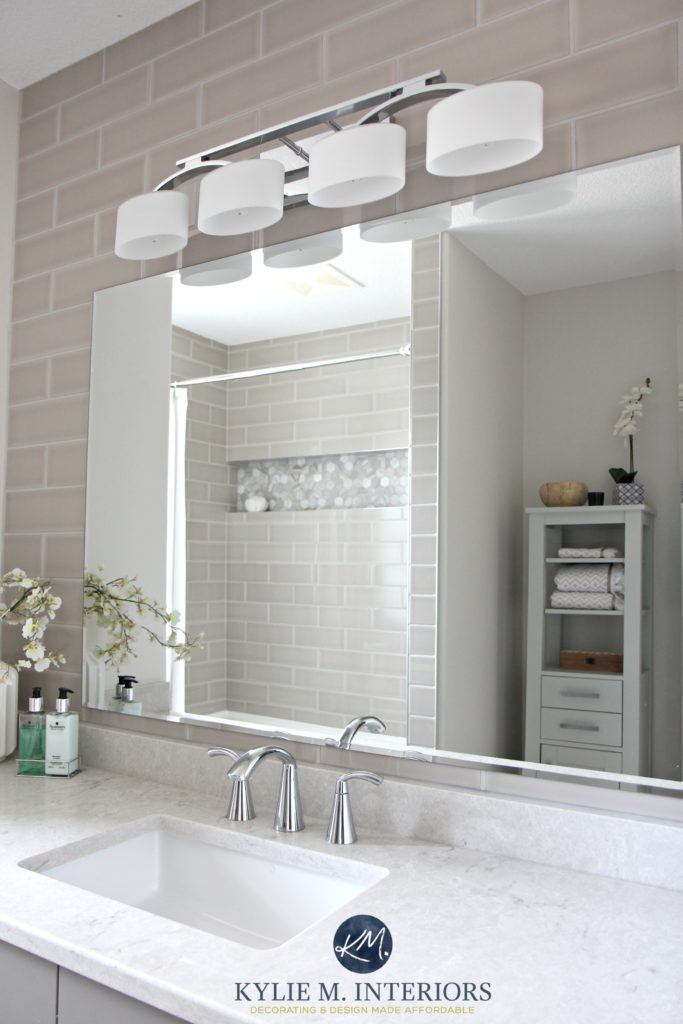
And LOOK at the shower reflected in the mirror!
From the beginning, I knew I wanted to make the wall behind the vanity a feature. I tossed in between subway tile, wallpaper, a wine rack, or jazzy accent tile. I went with Subway tile because it was affordable, and apparently, wine racks in bathrooms are taboo (pshaw).
To save money, I had Delea of Details Painting spray the maple vanity in Benjamin Moore Metropolis. Her work was SEAMless and saved me a whack load of money!

Laminate Countertops – High-End Ideas, Low-End Prices
The flooring is a gorgeous 12×24 porcelain tile from City Tile. It has a subtle texture and a mix of white, greige and beige tones. I also used it instead of a traditional baseboard.
THE FAUCET
I wanted a two-handle widespread faucet rather than a lever style, so I chose the Glyde Collection from Moen. Because the vanity is six feet long, I feel like this style better suits the length, and I like its graceful lines. From there, I coordinated the light fixture to have the same finish and the same smooth, slightly curved lines.
4 Subway Tile Ideas for your Kitchen and Backsplash
THE TUB & SHOWER AREA
The tub and shower…why would I EVER want to change it? The funny thing is, 4×4 white tile is coming back in style, however, I ain’t hoppin’ on THAT bandwagon. I either wanted a large 12×24 tile or some type of subway tile.
And the winner was subway tile! After exhausting all of the possibilities (you have NO idea how much I agonize over my own home – there is no wine bottle large enough to settle me), I landed on this awesome 4×10 tile from Lowe’s. MAAAAD love. It’s greige, soft, and subtle as I wanted the bathroom to feel fresh and clean, but not ‘stark’.
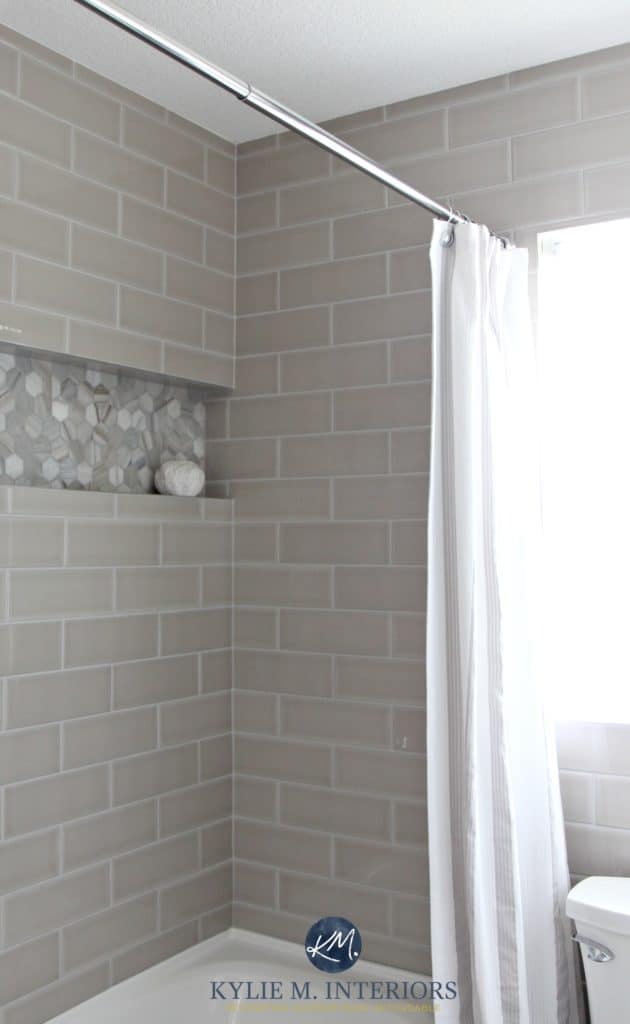
Seriously, the hexagon accent tile just about did me in when I first saw it; I started drooling on-site and almost biffed it in my own puddle. I’d looked HIGH and low for just the right accent tile and THIS was it!
I found it at Cornerstone Tile in Nanaimo. The warm, greige tones were a nice break from the traditional white/gray/black marble I usually work with in my Online Consulting.

I made a 10″ high wall-to-wall niche for a simple look with some function. I didn’t want it to POP, but I wanted it to be a classy statement.
Notice how the subway tile continues right to the end, where it meets the alcove seamlessly.

I also chose the Glyde Collection for the tub/shower, for a coordinated look. I’m not really into the huge rain heads and like the simple, low-key look of the Glyde unit.
AWKARD NOOK BEHIND THE DOOR
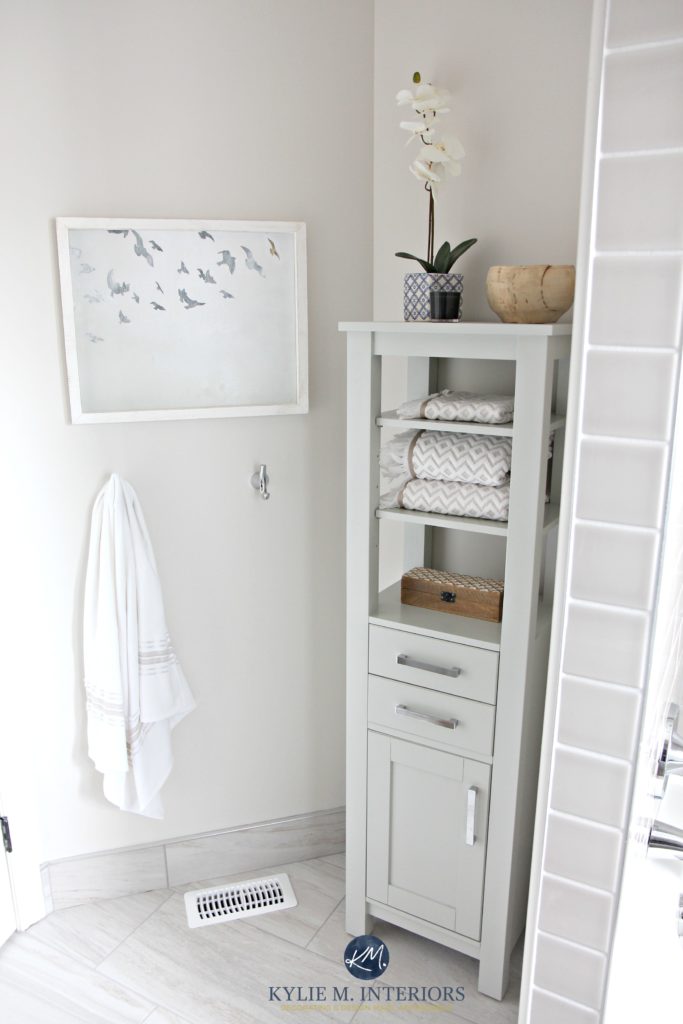
As for the awkward area behind the door/shower area, I found this linen tower on clearance at Lowes, and it filled up the space perfectly. Along with my Glyde robe/towel hooks, this area is now functional and pretty darned purdy!
And look at how soft and subtle Classic Gray looks. I darkened it by 25% to give it a willy wink more depth, and it still offers just the right gentle touch for this space.
And who gets MAD props on this project? Brett Edwards, that’s who! Brett of BE Tile did an awesome job from start to finish. He humored me (as most people do) when I couldn’t make up my mind and went above and beyond to make sure that everything turned out JUST how I was hoping. The only negative was that he didn’t bring his baby Maxwell over enough so I could get my baby fixed!
Want to know if painted maple cabinets lasted?
Our Maple Painted Cabinets – 2 Years Later
READ MORE
4 Tile & Shiplap Ideas for a Small Bathroom
3 Ideas to Add PERSONALITY to Your Small Bathroom or Powder Room
The 6 Best Paint Colours for a Bathroom Vanity
The 12 Best Whole Home Gray & Greige Paint Colours

Want some personalized ideas for your own home? Check out my Online Color Consulting!

Originally written in 2017, awesomely updated in 2025 for you!


So beautiful! Well done. ???? I had a bathroom where you could see the toilet too and so I installed a spring hinge on the middle hinge and the door swings slowly shut to spare the view! I also put a “WC” on the door so guest no where to find it!
Hi there,
I really like your choice of subway tile in the washroom. I have read the article several times and I know that the tiles were purchased at Lowe’s but I didn’t find the colour of the tile. Do you remember the name?
Richard
Hi Richard, I think it was something like ‘Pearl Gray’ perhaps, from the Allen and Roth line – unfortunately we’ve since moved so I can’t look at the spare box!
Hi Kylie
Your bathroom is gorgeous and an inspiration for our upcoming remodel. By chance were you able to verify the name and brand of your tile floor? Thanks so much for sharing.
Kathy
Hi Kathy! I believe it was called Bellagio (Beige or white) from City Tile here in Nanaimo – I’m not quite sure who their main supplier is though…I hope that helps a bit!
Hi there. Beautiful bathroom!
I was curious if the tile went all the way to the ceiling prior to the remodel or is that something you added. I was just going through a contractor not a designer but he thought the tile going all the way up would make my small bathroom look even smaller.
Hi Kim! The tile didn’t go all the way up, and it can actually make the bathroom look larger as there will be less breaks in horizontal surfaces – consistency is much better, I’d go all the way up every time!
Hello Kylie, your remodel is beautiful!! If you don’t mind my asking, how much did this all cost? I am wanting to make over my bathroom and just want to be realistic with a budget.
Ooo, good question, let’s see…
Painted vanity: $600
Countertop: $1200
All tile: Approx $500
Labour for tiling (demo,prep,install) – $2500
Plumbing: I was given the plumbing fixtures by Moen and just bought a $350 toilet.
So I would say in the end, hardware, paint, all that jazz, between $5-$6000.
Hope that helps!
We’re redoing our shower and I was hoping to make a niche just like this! Wondering how you made it go end to end with the studs being there?
Hi Tam, it was a non-load bearing wall, backing onto a closet, so we cut into the studs and had the fellow rebuild around them a frame of sorts for the niche to sit in!
Did you use same grout color for floor and wall tile?
Hi Sonya, no we didn’t! I don’t remember what they were, but the first round of grout on the shower tile was not done the right way (they did the wrong colour), so they had to use a grout tint/paint to change the colour! The floor is lighter 😉
Your bathroom turned out great! What is the length of the vanity? I ask because I want to get a 60″ with one sink but the opinions from my daughter and the plumber is that 1 sink will look weird on a cabinet that long.
Thank you Sandra! Actually it was a slightly longer one, I think it was 65″… 🙂
Forgive me if this has already been asked. How much did you budget for this remodel?
Hi Celia, it was a few years ago now, but i BELIEVE it came in around $5-6000. Not having to replace the vanity was a HUGE savings, but the tile labour was the big cost… 🙂
Love love your remodel!!!! What type of tub did you go with and color?
Hi Carol, we actually kept the original (white) tub as it had a great shape to it and was in good condition 🙂
I may have missed it but what is your trim paint in bathroom?
Hi Mary! We’ve moved since, but i THINK I did BM White Dove 🙂
Hi Kylie,
I was wondering what color tile you have in your bathroom. I ask because I am looking for the perfect greige to tone down the pink tone I am seeing in my taupe tile. Do you think classic gray would work? Unfortunately, the piece of tile alone looked to be the perfect taupey/gray color but when up on the wall I see pinkish tones. I really appreciate your help!
Thank you!
Lori
Hi Lori! It’s hard to say without seeing photos, but I personally used Classic Gray and had great success with it! I darkened it by 25% though, just to get a bit more body from it.
Hi Kylie,
I am in the middle of a remodel of our 1/2 bath and decided to use the same cabinet color as you used in this bathroom remodel. However, our local BM store doesn’t darken any paint so I cannot use the 25% darkened classic gray you used. What other color would best match the 25% darkened classic gray? I tried Balboa Mist as this was the next color on the color strip next to the classic gray, however, I found that color a bit too dark next to the Metropolis (aka Eagle Rock). Thanks for all the information you provide through this website.
Take a look at Sherwin Williams Egret White and see how it feels!
Kylie this looks lovely. I am planning to do a double shower no tub which means il will have a dead space too – from shower stall. A linen closet does not thrill me. ???? do you think your concept would translate? Your area has a lovely little curve .
Thanks Jan
Hi Jan! I quite loved this little spot! If the wall were flat ALL of the way (and didn’t angle out) I would’ve even considered doing a bit of beadboard/board and batten on that wall and hanging hooks with a bench underneath. :).
Do you have the name of the accent tile. Our bathroom is being redone as we speak. I’m going crazy trying to find the accent tile and boom that’s it!!!
Oh, I don’t have the name any more, it was several years ago, but it WAS from Lowes and the colour was Pearl (I think…) and it the Roth and Allen brand (we’re in Canada, but I’m sure I had someone in the states be able to track it down :).. I hope that helps!
I have that same subway tile in my kitchen for the backsplash just in the smaller size! I absolutely love it! 🙂
Beautiful greige bathroom luv it all. Kylie I was wondering how you hung your frameless mirror on the tile wall?
Good question! We actually got a mortar bit and went through the tile – which WAS NERVE-WRACKING, but actually went really well! I’ve done a few similar things since – sloooow and easy.
Hi Kylie, I love your bathroom colors. I have a similar layout and we are in the middle of our remodel. I will be using a shower curtain as well, did you use a tension rod? I’m trying to find one that doesn’t rust and those are mostly stainless steel but I worry about it falling and chipping my new tub. Any suggestions?
Thank you!
It’s SO HARD, isn’t it? I finally got one at Home Depot that the hubs had to screw into the wall – so no more tension.