
Posted on May 9, 2020 by KylieMawdsley
A home update CHOCK full of great ideas that YOU can do too!
You know how some rooms just speak to you? If you don’t, you should drink wine like I do and then you’ll be having full conversations with everything from rooms to dogs! Seriously though, have you ever been in a room that’s out of your comfort zone or not your personal style, but there’s SOMETHING about it that hits a happy place? This home definitely did that for me.
This post may contain affiliate links. If you make a purchase through links on our site, we may earn a commission.
I think it’s a combination of the look along with the homeowners’ obvious blood, sweat and tears that drew me in.
And who are the homeowners? Melisa and her ever-loving, EVER-PATIENT hubby, John. I bet if John and Tim got together they’d be able to swap wife war stories for HOURS. Oh, and did I mention that they did all of this with FOUR kids under the age of NINE underfoot. Yup. (insert wine and funnel here, or maybe that’s how they GOT all of those kids…wink wink).
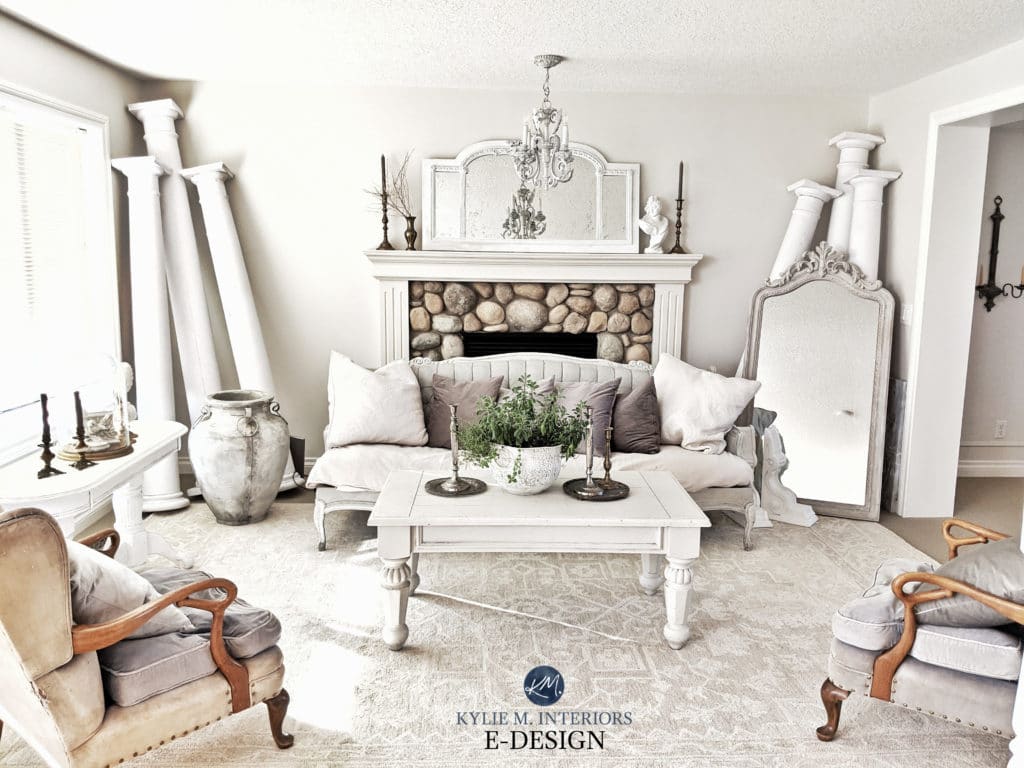
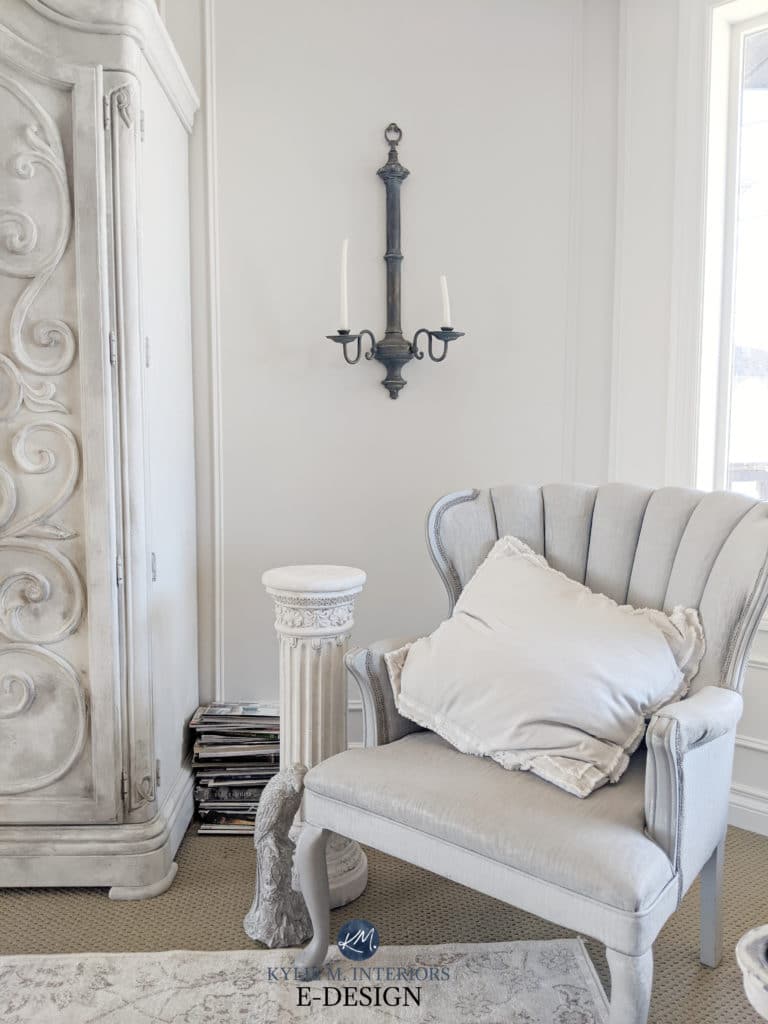
This home really IS a reflection of the tastes of the people who live there and THAT’S what makes a home to me.
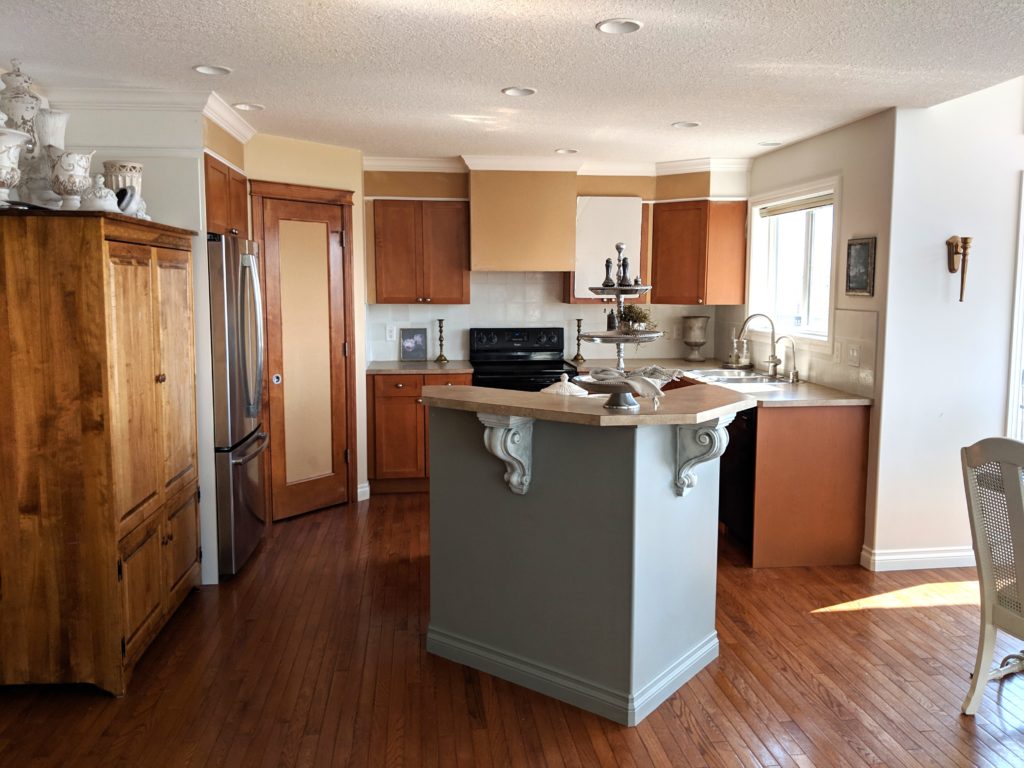
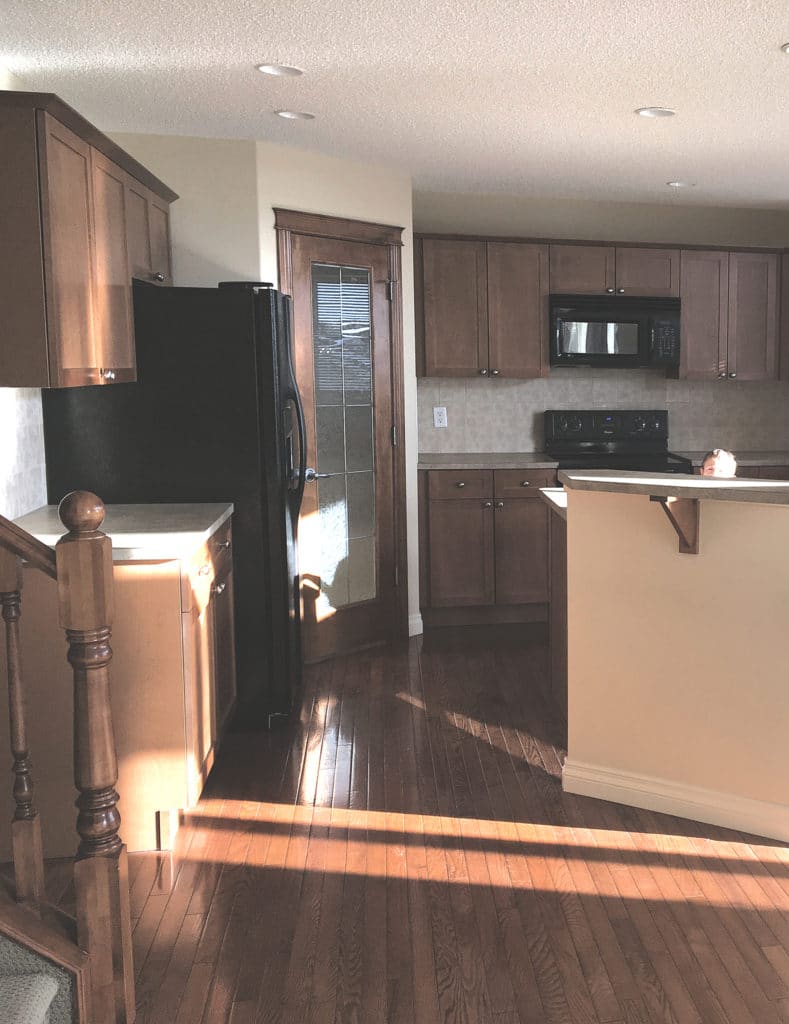
Now, with this whole remodel, there were a few things staying put:
- The beige laminate perimeter countertops
- The black appliances (being changed to stainless steel eventually)
- The maple cabinets
- The wood flooring
- The backsplash
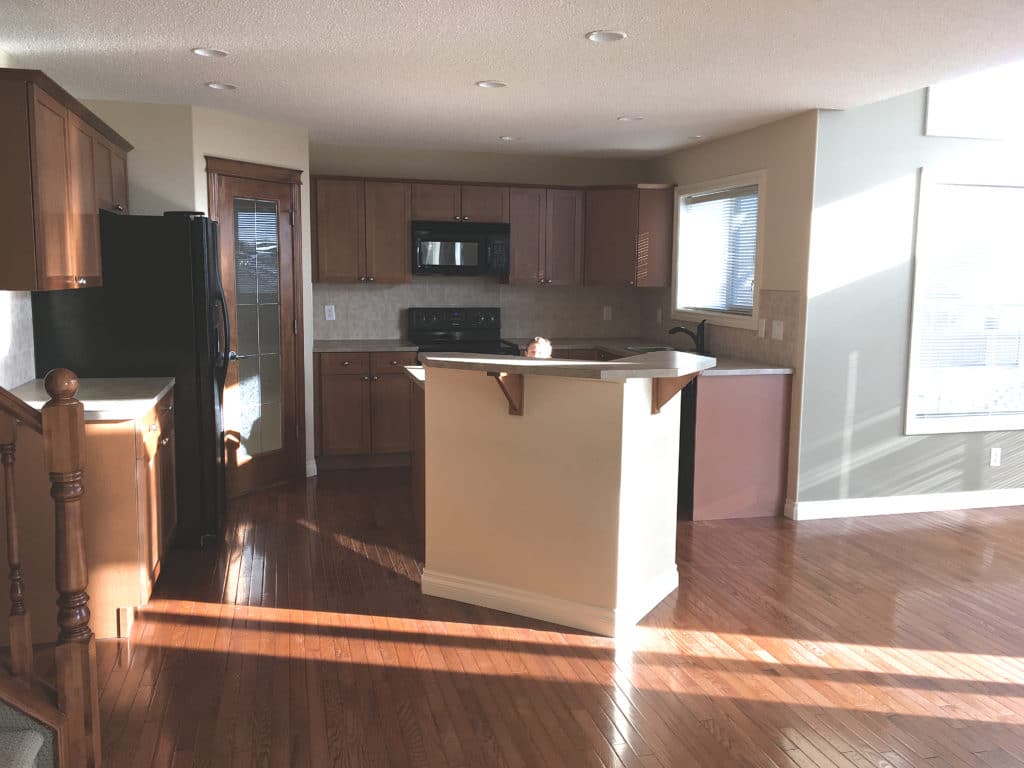
But a few things were going to change – DRASTICALLY…
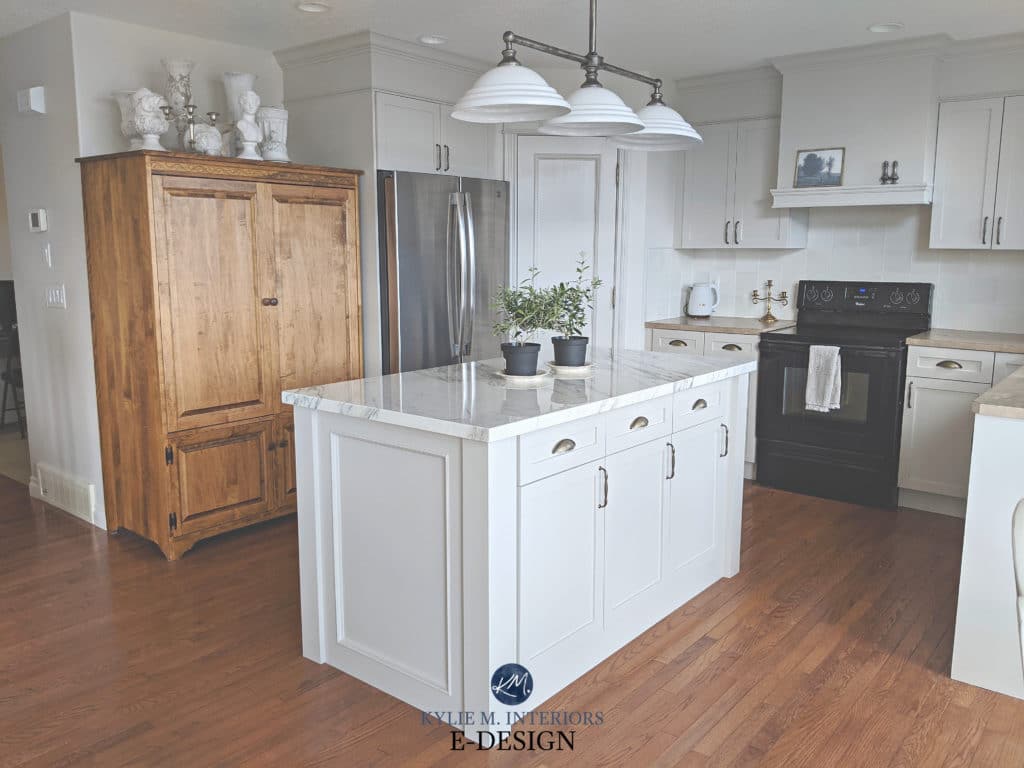
- The island would be taken down to one height
- The NEW island countertop would be marble
- The over-the-range microwave came DOWN
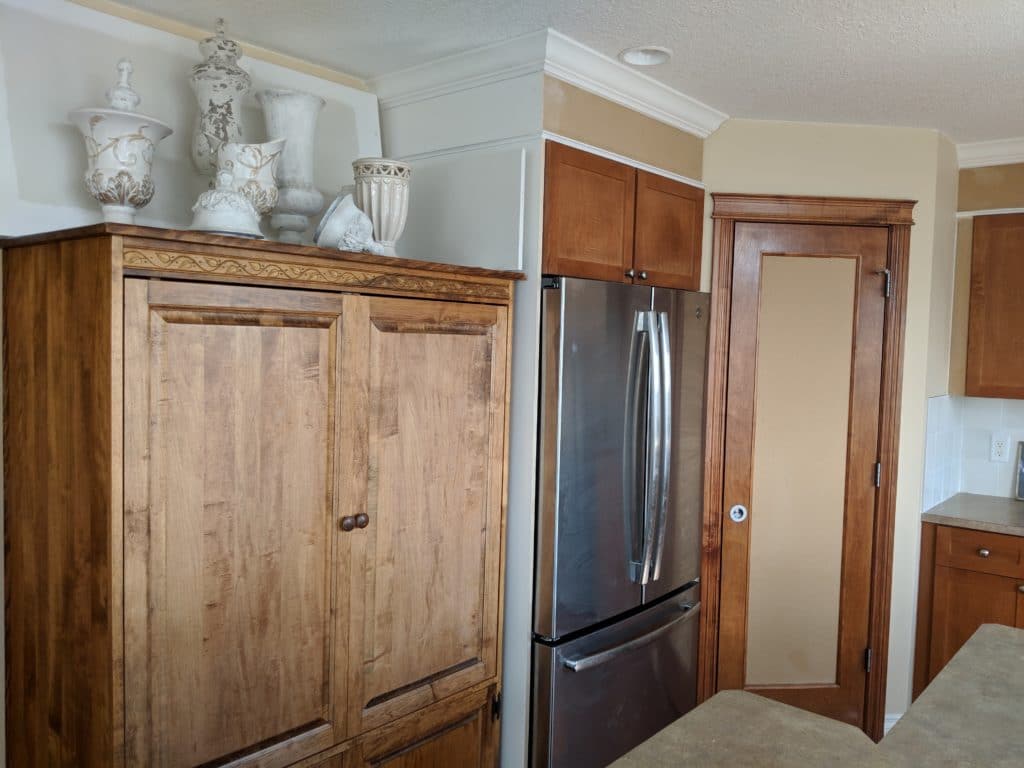
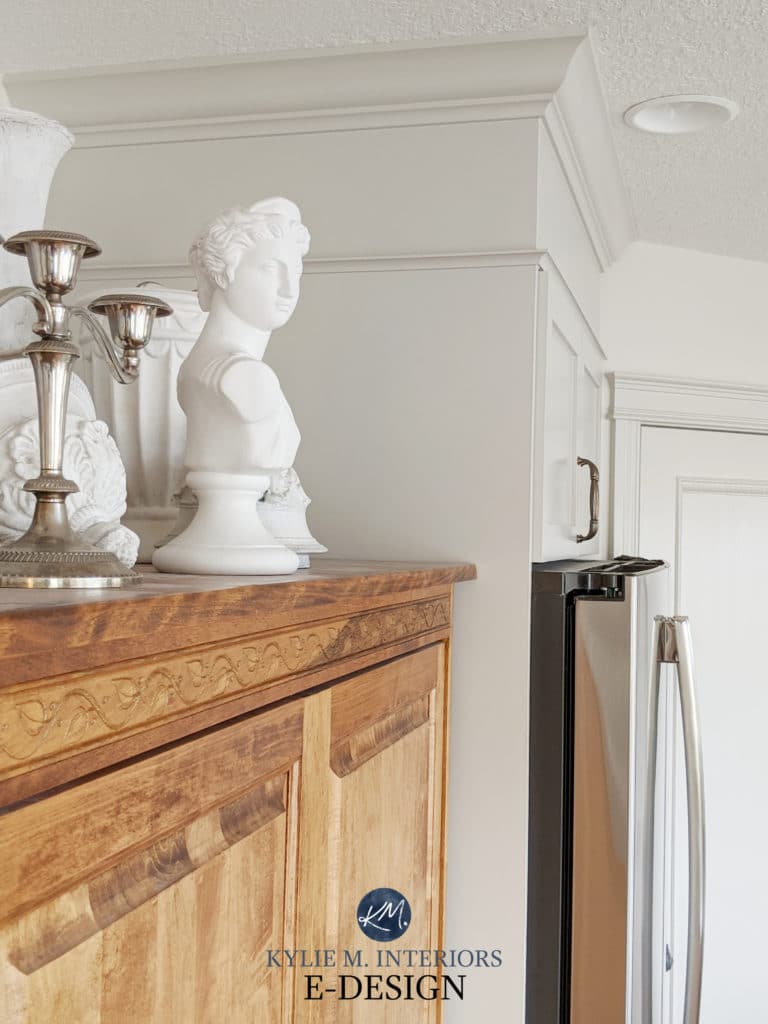
- The soffits would be filled in to get a full-height cabinet look
- The area to the left of the fridge would be changed to add MORE storage and CHARACTER
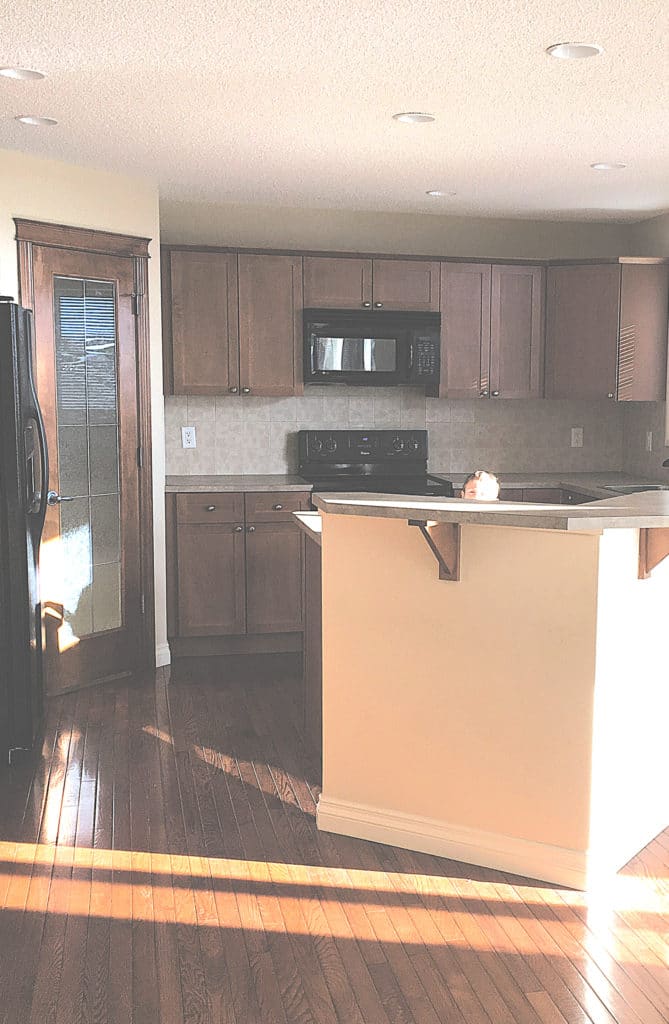
Let’s see how it all turned out…
The Main Kitchen Area: Painted Cabinets and More…
As you can see, they filled in the soffits, added crown moulding, rebuilt the range hood and filled in the ‘glass’ portion of the pantry door…
And here it is. Seriously? Yup, seriously…

And not only did they paint the cabinets, but this husband and wife duo even painted the BACKSPLASH.
Can you really paint backsplash tiles?
HECK YES YOU CAN!
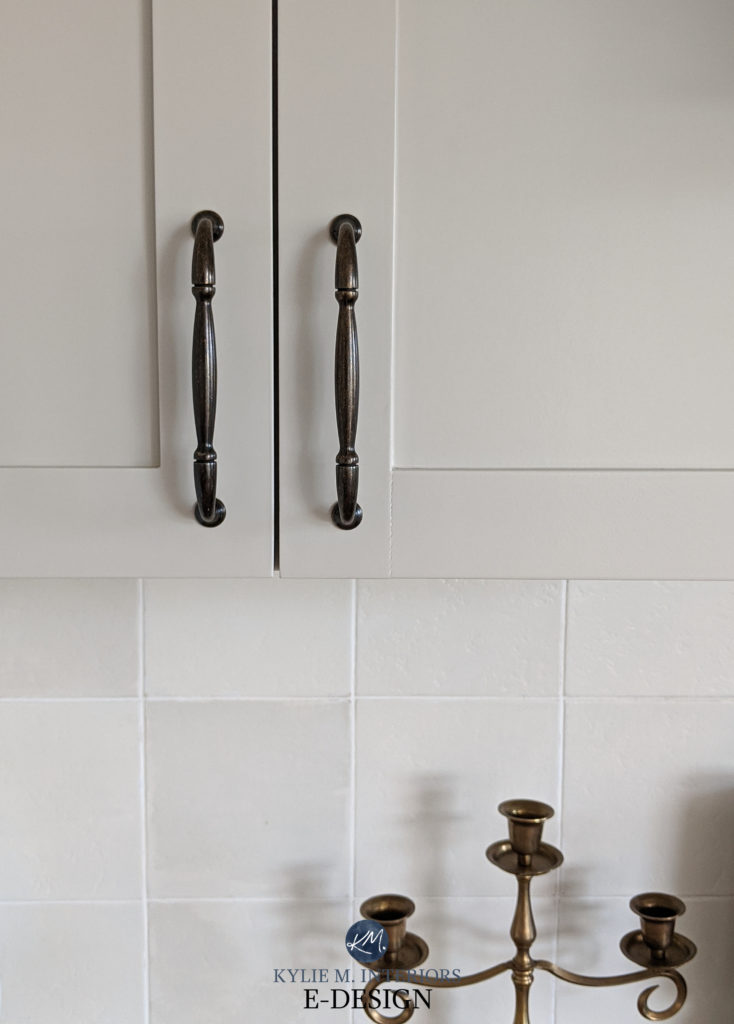
Melisa handpainted each backsplash tile herself. She wanted the look of handpainted Zellige tiles and used a combination of colours to get a soft, subtle, textured look. SO FRIGGIN’ AWESOME! (I know some of you are thinking of paint YOURS now!).
And I really respect that Melisa and John did all of this on a budget – a SERIOUS budget. I mean, anyone can create a dream home with a huge bank account and professional help, but there’s something to be said for ‘improving and adding to what you already have WITHOUT breaking open the kid’s piggy banks’.
Read more: 4 Ideas to Update Your Kitchen on a Budget
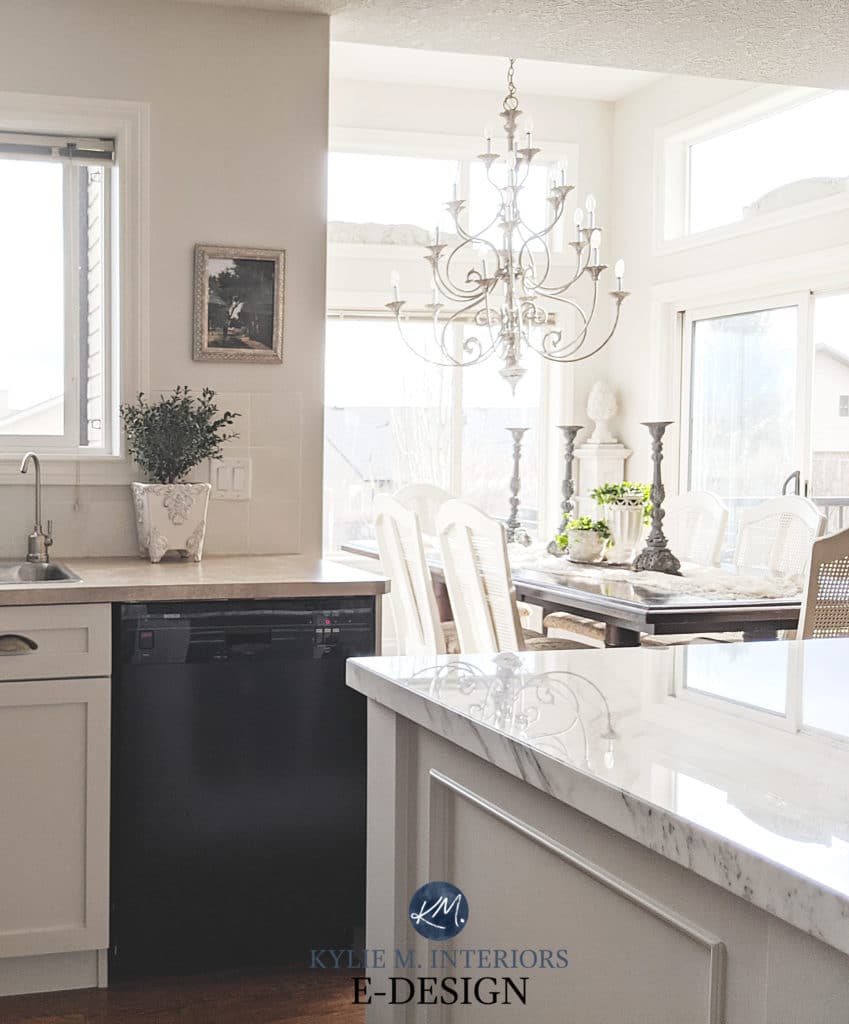
The Rebuilt Fridge Area
Let’s look at that fridge area a little closer…
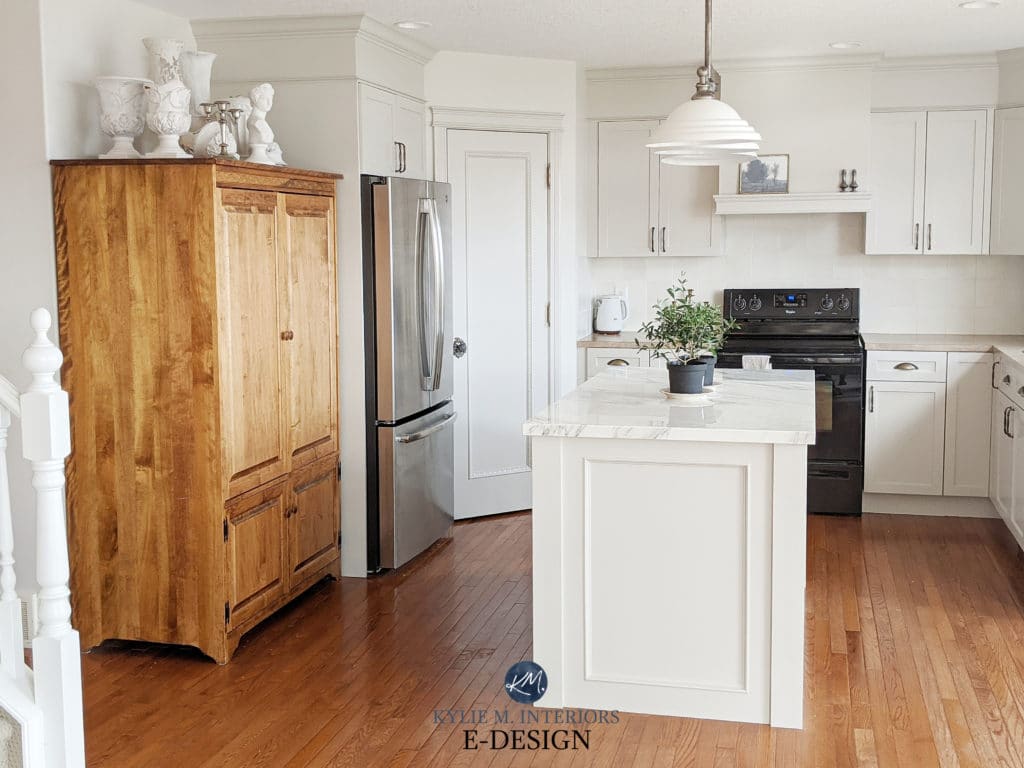
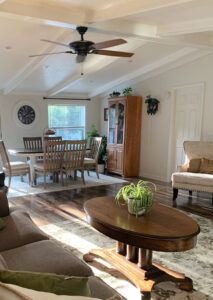
The rest of the open layout space
The glory doesn’t just stop in the kitchen…
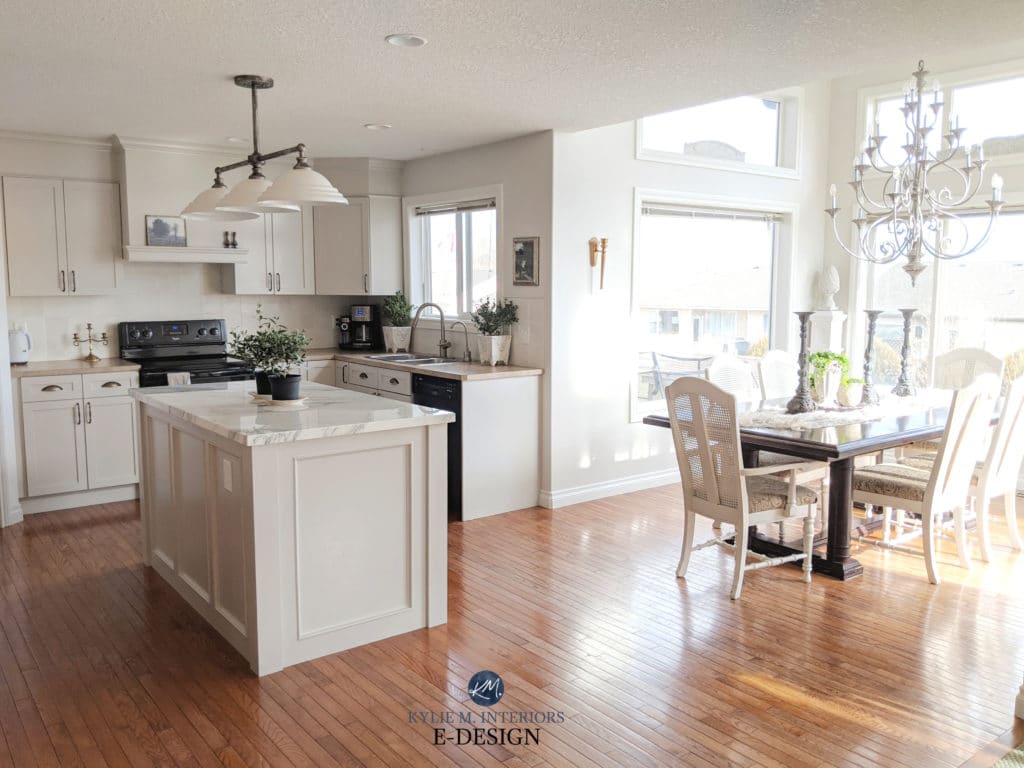
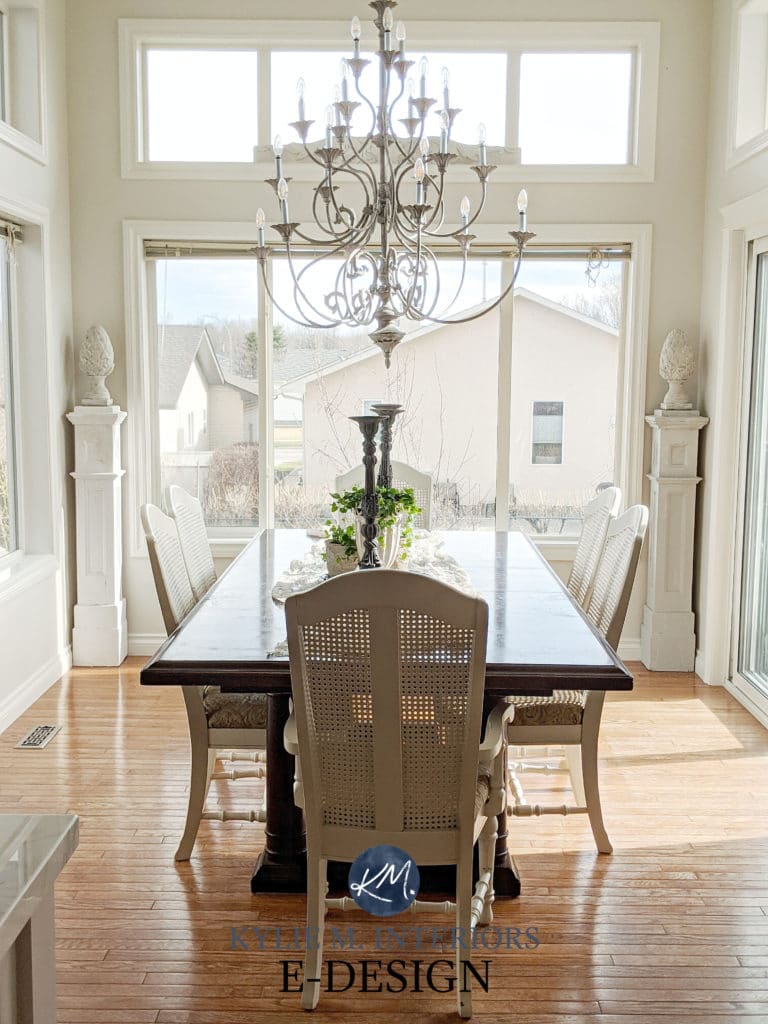
Did you notice the dining chairs in the above photo? We’ve ALL seen versions of those, but I bet you HARDLY RECOGNIZED them in their new glory! It’s AMAZING what a little paint and fabric can do to Grandma’s old dining set (let’s safely assume there was some wine in the mix as well).
And are you ready for THIS…?
Ermergerd. So…cool. And again, you don’t have to LOVE a certain style (I’m more of a west-coast-transitional-mish-mash gal myself) to be able to appreciate HOW FRIGGIN’ WELL it’s been done. (Just look at the arms on those chairs…I’m melting).
And seriously (because I never stop talking even though I know you’re just here for the pretty photos – and my charming wit), I RARELY get clients with mad style and photography skills like Melisa. I hardly had to edit the photos, they came in crystal-clear. And Melisa’s decorative style? Holy friggin’ cannoli. You don’t have to be a fan of the romantic style to see how beautiful this space is, it speaks for itself whether you’re into mid-century modern, traditional or modern farmhouse!
And get a close-up look at the paint colour in these next photos. Calm perfection.
And how about those PAINTED CABINETS?
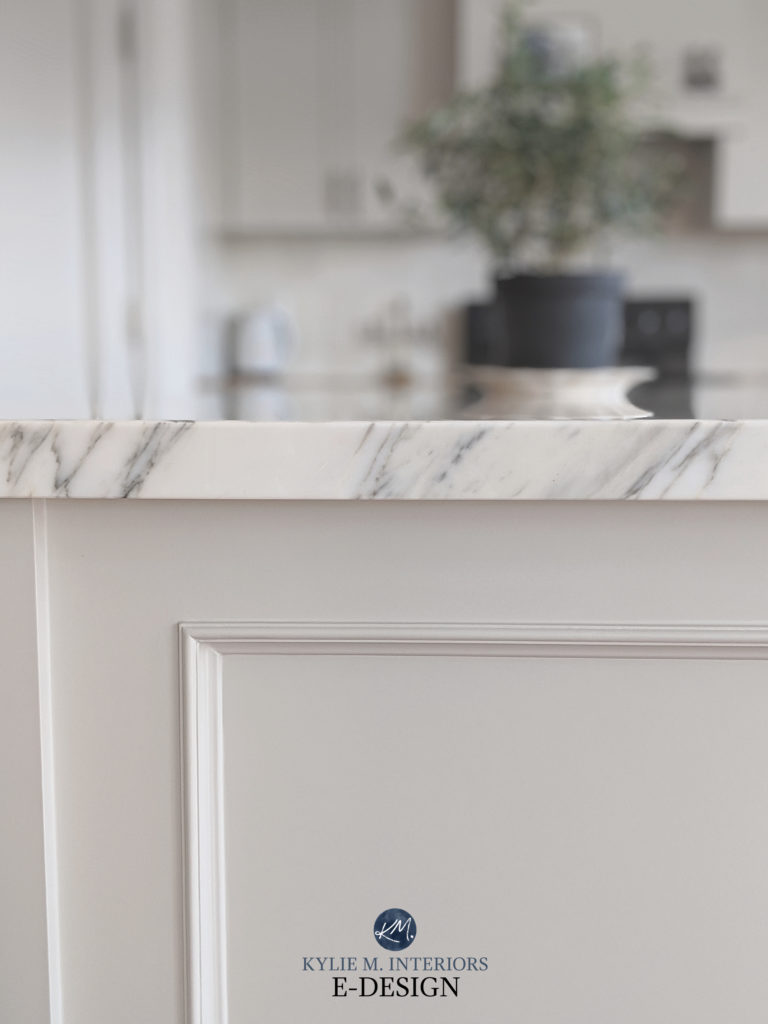
Believe it or not, they found a salvaged piece of marble for the island countertop (it’s what really inspired this whole thing). It had a few scratches that they EASILY overlooked for the price tag!

Read more: How to get the LOOK of Marble Without the Price Tag
Read more: The New Era of Laminate Countertops and Why They ‘Rock’
So, I’m sure by now you’re thinking, ‘Kylie, I’m DYING to know what COLOURS they used, can you spit it out already?’
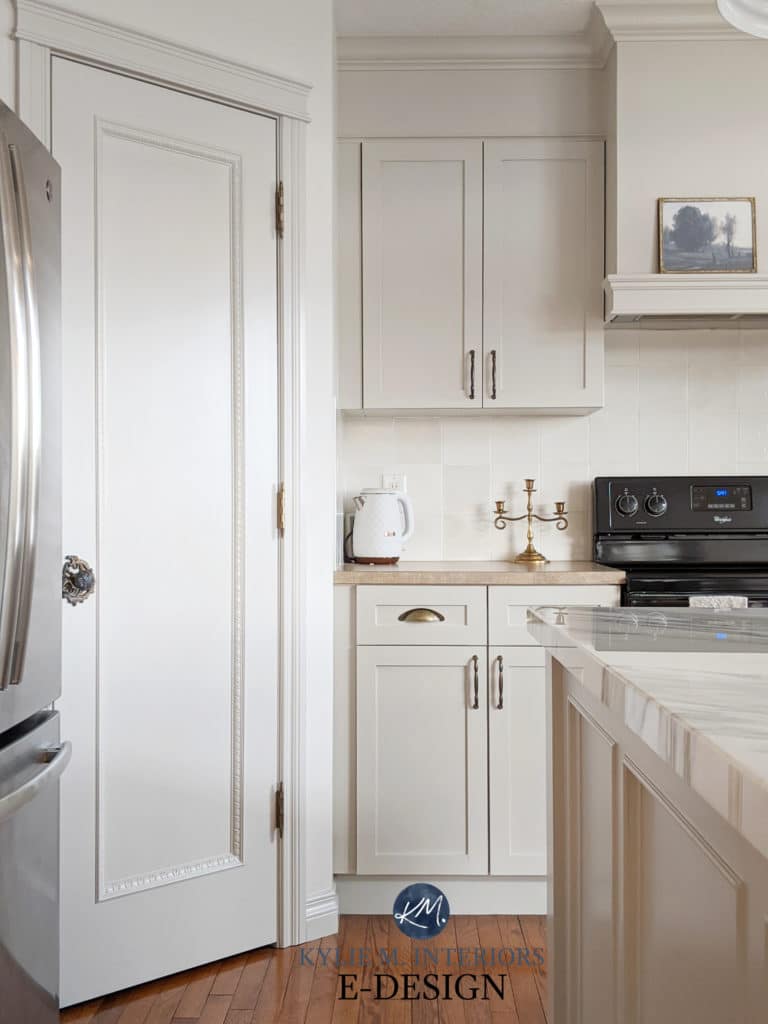
- Walls in the open layout kitchen, dining room and living room: Benjamin Moore Classic Gray
- Cabinets: Sherwin Williams Agreeable Gray
- Trims: Benjamin Moore White Dove
- Backsplash: A blend of Agreeable Gray, White Dove and Collingwood
Read more: The 12 Best WHOLE HOME Gray and Greige Paint Colours
Now, let’s talk about BUDGET…
Believe it or not, they did this all for under $3000. That’s right – 3…thousand…dollars.
Without getting into the nitty-gritty, let’s hit a few main details:
- The cabinets were going to be $4000 to get professionally painted. They hired someone to spray the DOORS only for $1000 and did the rest themselves!
- The marble island was a SALVAGED PIECE with a few scratches that were EASILY overlooked for the LOW price tag!
- The furniture pieces were passed down from grandparents and painted to suit their style
- The light in the dining room? You’re not going to believe this, but they found it broken and encased in 6 inches of solid ice. They brought that glorious beastie back to LIFE, even if it took 10 years off of John’s life
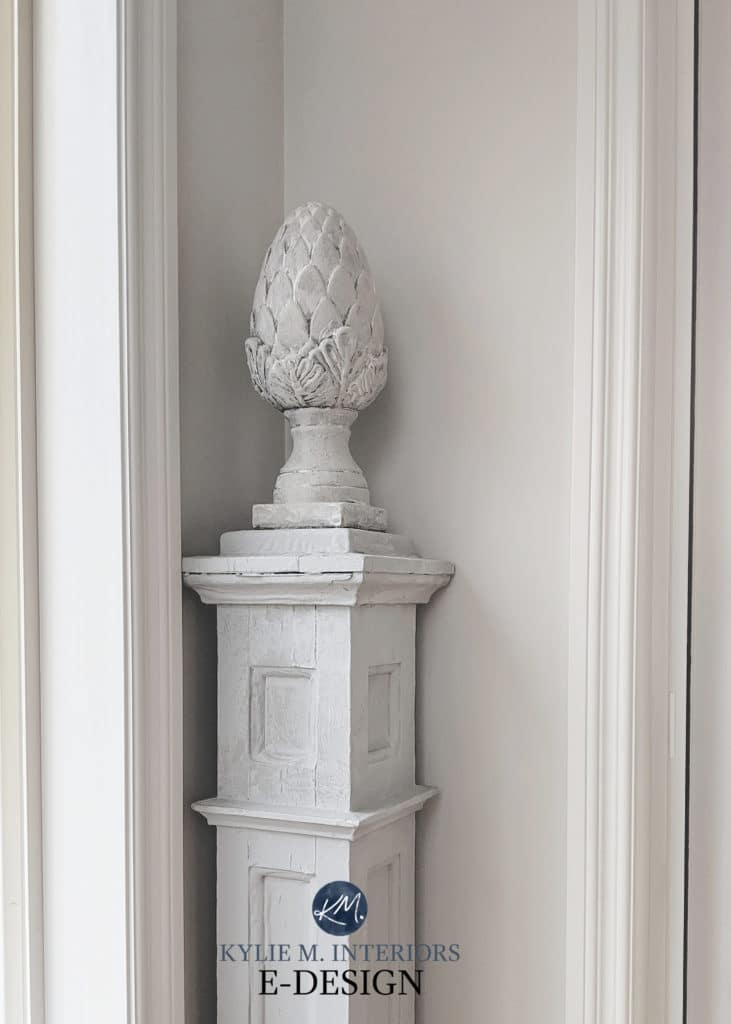
- All of the decor was found at salvage centers and marketplaces
I’m just so friggin’ PROUD.
Chat soon,

NEED HELP WITH YOUR HOME UPDATES?
Check out my Online Paint Colour Consulting, I’d love to help!
READ MORE
Kitchen Cabinet Makeover with Benjamin Moore Classic Gray, Granite and More!
Should I Paint My Kitchen Cabinets? A QUESTIONNAIRE
Comments
Leave a Reply
More Posts
The 5 Best Creamy White or Off-White Paint Colors
THE ELUSIVE ‘CREAMY WHITE NEUTRAL’ When it comes to light, warm neutrals, it’s all in the undertones. And other than pink and green, yellow is the undertone many of my
Read More
The 8 Best Warm Neutral Paint Colors With NO Yellow Undertones!
The Top Light Depth, Warm Colors That Aren’t Cream! When choosing the best warm neutral paint color for your home, whether creamy white, beige, taupe, or greige, your choices are
Read More
The 12 Best Farmhouse Sinks of 2024
FIND YOUR DREAM SINK HERE… While traditional farmhouse design was all the rage in previous years, the embers have definitely cooled. As for MODERN farmhouse, it’s still kickin’ its cowgirl
Read More


I don’t suppose Melisa would share her process for doing that gorgeous backsplash in 3 colors? I have horrific tan tiles in our open concept kitchen and I am willing to do the work. I just don’t know the process. I love that tile style as well. Thank you. Hats off to the value of work coupled with design guidance, swish!
Author
Hi Cheryl! I’m going to send Melisa a note and let her know that if she wants to share anything, she can keep tabs on the comment section! I’m just posting this to my subscribers this evening, so I’m sure a few more questions will come in :).
Thank you SO much! I purchased your “quick and easy paint color guidance” package because your other packages were sold out. I just received your consultation, and it exceeds any expectations I had. This is so incredibly helpful because I can’t see undertones. I can’t wait to check out the articles you’ve linked. Thank you again!
Author
Oh wow, Maureen, this is SO nice to hear – you’re actually the FIRST ONE I’ve done! We were just trying to come up with something that I could do in a shorter amount of time, to help those who couldn’t get the sold-out packages. I’m just SO glad to hear this – thank you!
Hi Kylie. Would you you recommend painting the tiles of a shower the same as the kitchen backsplash? My house, built in 1939, has baby pink tiles surrounding the tub and shower. Until we renovate we’re kinda stuck with them.
Thanks
Tammie
Beautiful makeover. I was curious where the microwave went. I thought perhaps on the island, but it does not look like it was moved there. That is one appliance I could not live without.
Kylie,
Thanks for sharing this kitchen update and the adjoining rooms, what a transformation! Their use of architectural salvage speaks to me and is beautiful. I’m also hoping for some guidance on the painted backsplash, she captured the hand painted look perfectly. It doesn’t have the “flat” look painted tile usually has. Also, enjoyed your writing, as always!
Cheryl
Author
Hi Cheryl, I’m going to send Melisa a note and ask her :).
Hi Cheryl!! Thank you for asking about the tile! Such a complement. I will lay out the steps I followed and hopefully that helps!
1. I sanded the tiles with a high grit sander and used TSP to clean thoroughly.
2. I scraped out all of the old, discoloured grout and wiped down again.
3. The tiles had a rounded edges so I scraped them down to a square edge and stained the edges dark to look aged. * Not nessesary
3. I then painted BM Fresh Start primer. This was done with a brush so I could alternate horizontal and vertical strokes without getting paint over the aged edges.
4. I used BM High Gloss Advance paint in 3 colours (Agreeable Grey, White Dove and Colonnade). You could use and combination of 3 colours close in tone that tied in your counter top and cabinets.
5. Alternating these colours and mixes of these colours, I painted each tile individually with alternating strokes on each tile. I did 3 coats after primer.
6. I sealed it with BM clear, high gloss sealant and re grouted with white and recaulked once dry.
It’s been a year with washing backsplash every day and it’s holding up fantastic.
I hope that helps!!
Melisa
Melisa,
Wow, that was a labor of love and totally worth it! Thank you for taking the time and sharing such a detailed process. Also, just noticed the door handle on your pantry…love it 😍
Cheryl
Hi Kylie, Again, you’ve posted an amazingly helpful post for those of us that are budget minded. Can’t believe the transformation but I have one burning question; where did they put the microwave?. Being height challenged, I find that my microwave over the cooktop is difficult for me to reach. I don’t like the idea of a counter top microwave ….any suggestions? I always am excited to read your posts and love your writing style. Expert knowledge plus humor makes my day!
Hello Catherine!
I hear you about not being able to reach the overhead microwave!
We put ours in the pantry in a shelf. My sweet husband ran the plug through the wall in the pantry to behind the refrigerator, being careful to follow code. Our pantry is nothing out of the ordinary. We just cleared a spot on the wire shelving and reinforced that shelf.
All the best!
Melisa
I’m obsessed with these cabinet pulls – any idea where they are from???
I would love to know where I can find them too! They’re beautiful!!!
Hi! I love your site!! This is awesome work!!
Question … have you seen Behr Pensive Sky or Rhino? any thoughts ? I’m looking for a light gray/blue for my entire 1st floor. I think. 🙂 Thank you !!
Author
Hi Dee, no, I haven’t! I try to showcase Behr a bit here and there and have a blog post on some of their grays (but not those ones). However, maybe you can compare them to see how they measure up! https://www.kylieminteriors.ca/the-6-best-behr-light-gray-paint-colours-cool-and-warm/
I am about to have to turn in my paint selections to my builder. I picked out Agreeable Gray for my walls, Pure White trim. I’ve never been a huge fan of white cabinets and every time I see something I like, it ends up being Agreeable Gray! Is it ok to paint my cabinets Agreeable Gray?? I’m just loving the warmth of this kitchen!
Author
So you’re thinking Agreeable walls AND cabinets? I worry about it being too monotone and limiting in the LONGterm for sure. Have you considered something a bit darker for the cabinets, ie. SW Dovetail??? What about doing white uppers and Dovetail for a bit of both?
I think that’s exactly what I’ve been waiting for someone to tell me! Thanks for the suggestions! I’ll check Dovetail out 🙂 I’ve been down a long rabbit hole clicking through all your links and gathering ideas! Thanks for being so helpful!!
I’m thinking of going with Agreeable Gray on my cabinets too. However, I have Eider White walls with Pure White trim and I’m not sure if all of that will go together. Any advice on that? Thanks!
Author
Oooo, that’s tough. Eider White has quite a bit of violet in it and Agreeable Gray could just settle too warm/dingy for it.
Thank you for this feedback Kylie! I had read that Eider White and Worldly Gray compliment each other but I found Worldly Gray to be just a smidge too dark and slightly muddy for my taste. What are your thoughts on cutting Worldly Gray? Also, I’m curious if you know what cabinet pulls Melissa used on her cabinet doors?