Posted on August 9, 2015 by KylieMawdsley
How to organize kids artwork & schoolwork
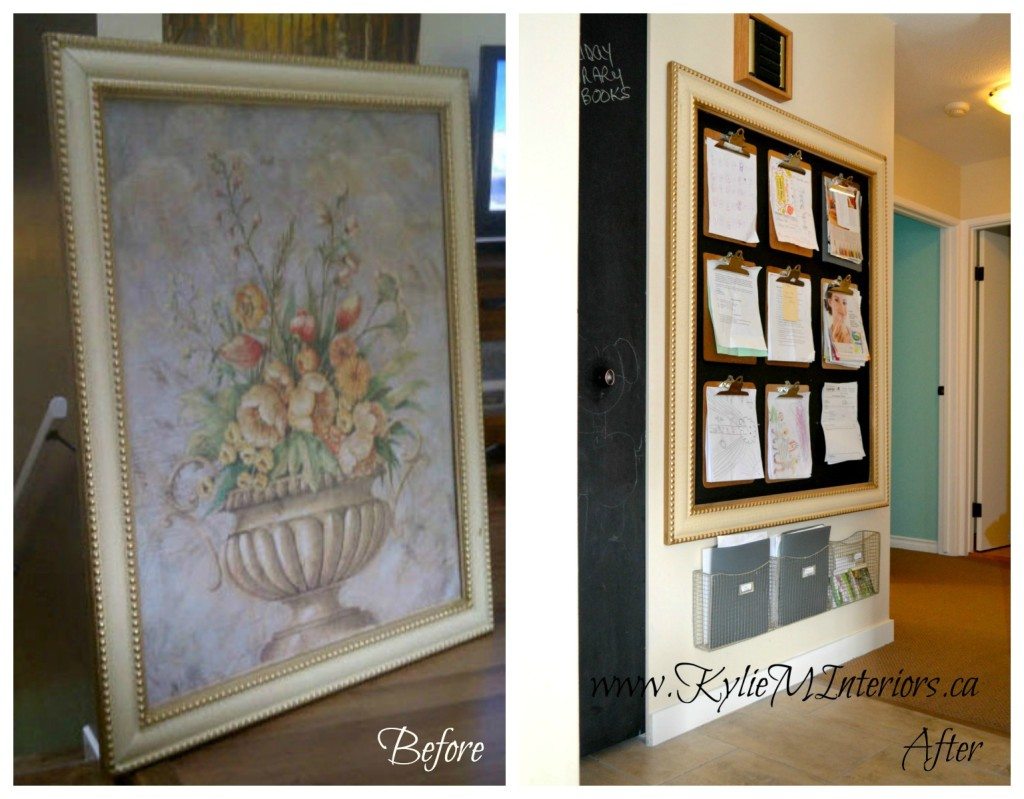
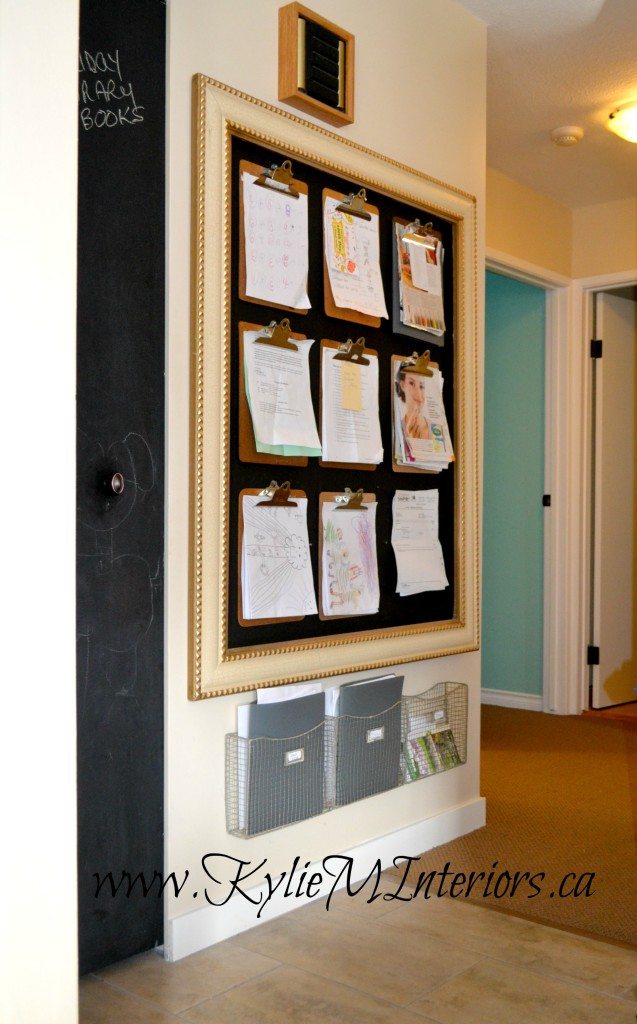
I called this “The Motherboard” for many reasons. First, I was going crazy with all of the forms/papers/artwork that seemed to have barfed all over my fridge. I needed a place to put them that was organized AND decorative – I needed a “control centre“.
Another reason why it is called “The Motherboard” is that all of the papers on it relate to my mothering requirements. Whether it’s permission forms for swim lessons, scholastic book orders, beautiful crayon artwork or a cute snapshot – this board will display it all AND look damn good at the same time!
This post may contain affiliate links. If you make a purchase through links on our site, we may earn a commission.
(and I apologize for the less than stellar photography, this was before I got my kick-butt camera and learned how to use it!)
THE HOW-TO…

STEP 1 FIND THE PERFECT FRAME
Easier said than done. I wanted a humongous frame – something with some personality and visual interest. After many afternoons scouring thrift stores and online sites I found it at the Recycle Depot. IT IS AMAZING in its 5′ X 4′ glory! It had an interesting floral painting in it which was actually quite beautiful and tragic at the same time – so out it came and it was donated back to the Recycle Depot (like I’ve said before, it’s kind of a cycle).
STEP 2 SPEND TWO HRS REMOVING THE STAPLES
There were approximately 118 staples (and yes I did count). The frame is really skookum so the staples were really well settled. A flat-headed screwdriver, needle-nose pliers and a glass of Bailey’s on ice did the trick.
STEP 3…
Make sure I don’t drop any staples in the carpet for Tim to inevitably step on and curse me for.

STEP 4 HANG THE FRAME ON THE WALL WHERE I WANT IT TO BE
Once I did that, I took a pencil and traced it around the inside edge. This line would provide me the framework to apply my background. Once I took the frame off the wall I knew I had to paint 2″ outside that line all the way around so that I couldn’t see any wall peeking out.
STEP 5 APPLY MAGNETIC PAINT
This is essentially a grey/black primer like product that you apply as a base coat so that you can paint the colour you like over top of it. It’s super thick and it really sprays when you paint it, so make sure to use drop cloths (I now have black freckles). It also smells worse than Tim’s hockey gear.
I applied three coats – as per the instructions, and well, I’m finding it a little lacking in the “hold” category. I mean it does hold magnets with a paper underneath, but I walked by it creating a bit of a breeze (not due to gas) and three of them blew off. I googled this problem and it seems like I am not the only one finding it kind of pathetic for holding things on the wall.
So, while the magnetic paint sucks, the black colour actually looks pretty cool. I’m going to leave it this way for now and when I get bored (so like tomorrow) I will paint the background a colour or maybe apply WALLPAPER!!!! LORD knows I have enough random gallons of paint tucked away that I can choose virtually any colour under the rainbow.
Now I figured if I’m going to be anally organized I may as well really nail it, so here’s my layout…
- Top Row: the girl’s schoolwork – spelling tests, worksheets and all that kind of jazz
- Middle Row: school forms to be returned, upcoming events, fun stuff to do
- Bottom Row: the girls’ artwork
Supplies and Cost
- Frickin’ cool frame $25 – Recycle Depot
- Magnetic Paint and roller $30 – Home Hardware
- Sorting Baskets $20 – Home Sense
- Clipboards $8 – Thrift Stores (still need to find 1 more)
Total Cost: $83
So there you have it, my sanity – safe and sound…for now.

READ MORE
Comments
More Posts
The 5 Best Creamy White or Off-White Paint Colors
THE ELUSIVE ‘CREAMY WHITE NEUTRAL’ When it comes to light, warm neutrals, it’s all in the undertones. And other than pink and green, yellow is the undertone many of my
Read More
The 8 Best Warm Neutral Paint Colors With NO Yellow Undertones!
The Top Light Depth, Warm Colors That Aren’t Cream! When choosing the best warm neutral paint color for your home, whether creamy white, beige, taupe, or greige, your choices are
Read More
The 12 Best Farmhouse Sinks of 2024
FIND YOUR DREAM SINK HERE… While traditional farmhouse design was all the rage in previous years, the embers have definitely cooled. As for MODERN farmhouse, it’s still kickin’ its cowgirl
Read More